In previous articles, we’ve looked at what makes the CANBus and why we need a communications method. We’ve also looked at the hardware required to connect a PC to the bus. Finally, we looked at three possible CANBus adapters, each with a common feature. They are all compatible with BusMaster. So, let’s look at the software element of getting connected to the bus and make a network connection!
BusMaster software

My preference for connecting to a CANBus is the BUSMaster program. BusMaster is an open-source software tool created by a joint project between BOSCH and ETAS. Unfortunately, the software hasn’t been actively supported by the parent companies since 2016 and is not bug-free. However, the functionality content is expansive, and there is no license fee to maintain.
Just download the installer from Github and run it to install on Windows. I use it with Win7 without problems. However, on Win10, BusMaster needs to be run as administrator to access the USB adapter. Of course, you could build and run your installer from the source, but that’s way over my head.
OBD-II connector for CANBus connection
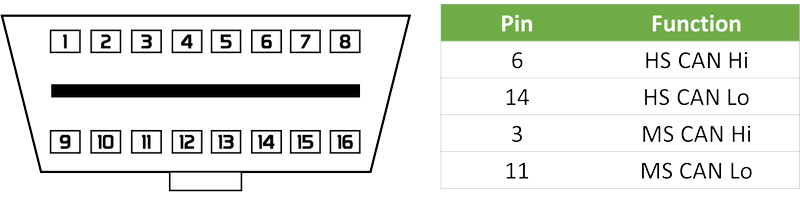
So the next step is to connect our chosen USB CANBus adapter to the vehicle, in this case, the Freelander2. We’re going to be plugging into the “On-Board Diagnostic” (OBD-II ) connector, which can be found at the bottom of the steering column on the Freelander2. To do this, we will need an OBD-II plug and a couple of D-SUB9 connectors with the right gender to match the USB CANBus adapter.
Connect the OBD-II port to the USB CANBus adapter following the connection details which came with your adapter and the pinout diagram above.
BusMaster setup
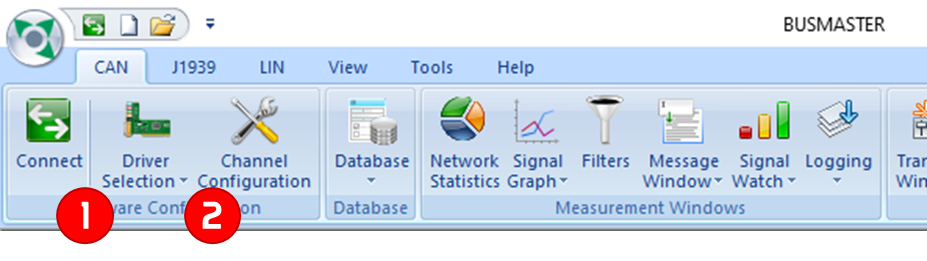
Okay, to BusMaster! First, we need to do some setting up. As in the picture above, you’ll need to make your driver selection (1) and Channel Configuration (2).
If you have a two-channel adapter, I recommend connecting the HS bus (High Speed, 500Kbpd) to channel one and the MS bus (Medium Speed, 125kbps) to channel two. If you only have a single channel adapter, I suggest you start out looking at the Medium Speed. Do not install a terminating resistor since we are connecting to a live vehicle. The importance of the terminating resistor will be discussed in a further article.
Save the configuration once you’ve set up the driver and channels (click on the BusMaster in the top left corner). Next, close BusMaster, connect the adapter to the car, turn on the ignition, reopen BusMaster and click connect!
Reading the connected CANBus data
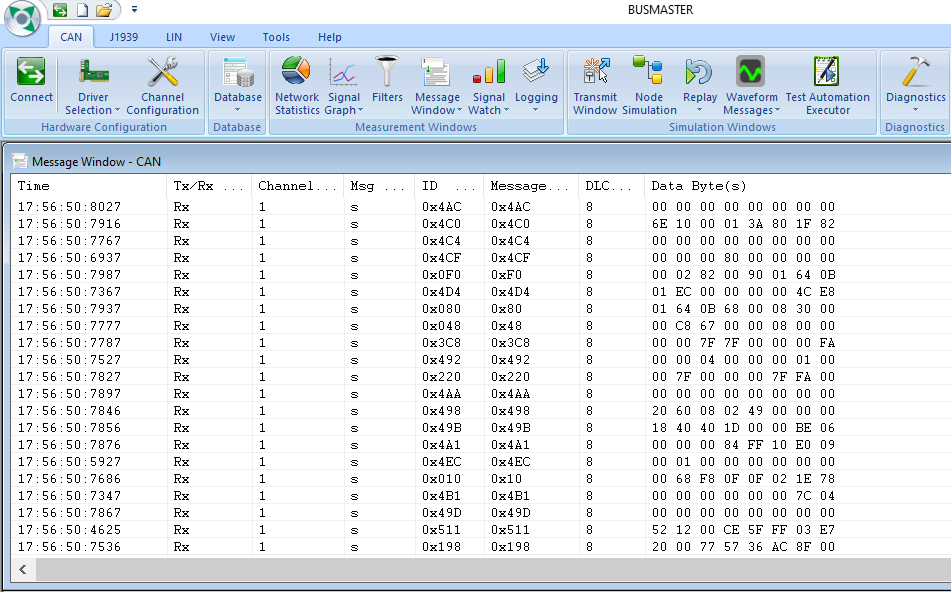
All being well, you’ll see something like the screen above, with the timestamps of the data continually changing. You have made your first CANBus connection. Congratulations, you are now a CANBus whisperer and can hear what the car says. I wouldn’t advise telling people you meet about your newfound skill.
Will it work first time?
Okay, so being realistic, there is a good chance this won’t work the first time out of the box. However, I’ve just installed BusMaster, the CANBus adapter drivers and made the trace above on a fresh installation of Win10, so it can be done. The biggest battle will probably be with the adapter drivers. For this reason, I prefer the Vector toolchain, they aren’t stupid proof, but they are reasonably easy to fault-find.
So are you feeling lucky? Ready to go it alone and connect to the car? Maybe you’d like to read the following article that will deal with how to resolve a CANBus crash due to human error.
M
prev: Getting on the CANBus
next: CANBus Crash Reset
Back to CANBus articles
Back to Electronics Articles