
Last year I picked up a Fiat X19, which came home for a bit of fettling before shipping to Australia. I think it’s fair to say it’s a dinky car which was just the right size for the garage I have. There was plenty of room to get around it, and the scissor lift didn’t push it through the roof. This year I’ve had a Citroen BX in the garage, which is just a little bit bigger. There’s not enough room to get around it, and with parts everywhere, I’ve entirely run out of space. Since I moved into the house, I’ve wanted a little more room for working in, and now that winter is here, I’ve finally caved and started designing and building the Mega Shed.
The problem
At the moment, the garage is trying to do too many things simultaneously. It’s a restoration shop, a metal show, a woodwork shop and a climbing gym, to name just a few things. Right now, as I write, just one corner has a radial chop saw, sandblaster, engine crane and a half rebuilt MI16 engine. Then piled on top are a range of boxes and bags. And that is the least busy corner of the garage.
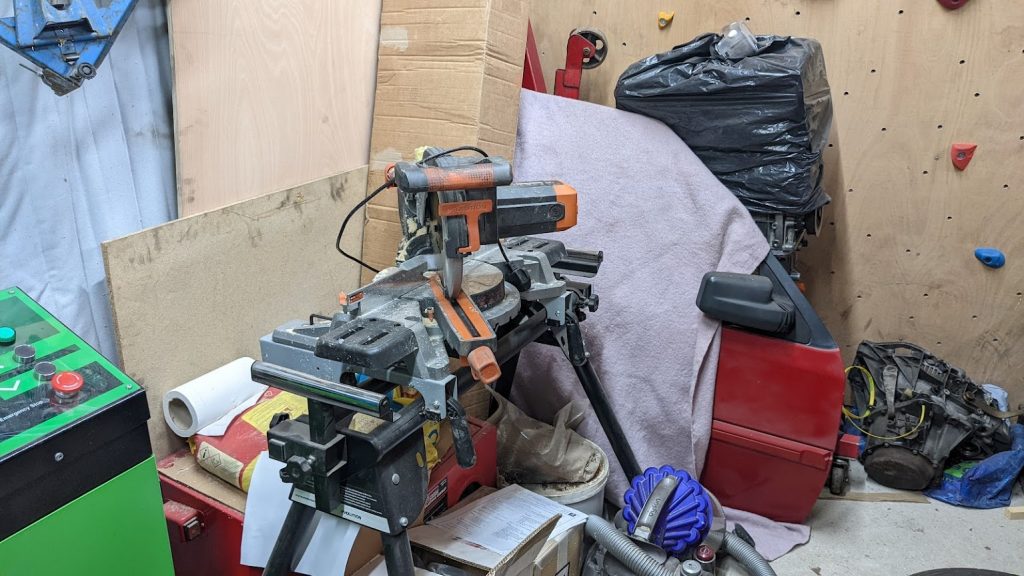
The amount of stuff, semi-restored parts for XPO, too many tools and bits of steel are seriously getting in the way. Pretty much every time I go out to work on the Citroen BX project car, I trip over something. I’m being driven mad by having too much stuff in too small an area. It’s also a considerable volume to heat, so I can’t just pop out for a few hours and be comfortable and warm during the winter months.
Finding space to swing a cat
The obvious solution seems to be to have a wooden shed. In my last house, I had a 6′ x 12′ shed, and it was glorious, quick to heat and everything was to hand. Okay, it was pokey and small, but it was ideal for so many quick projects, and many happy hours were had out there. Perhaps more importantly, all the garden tools and outside stuff were in another shed.
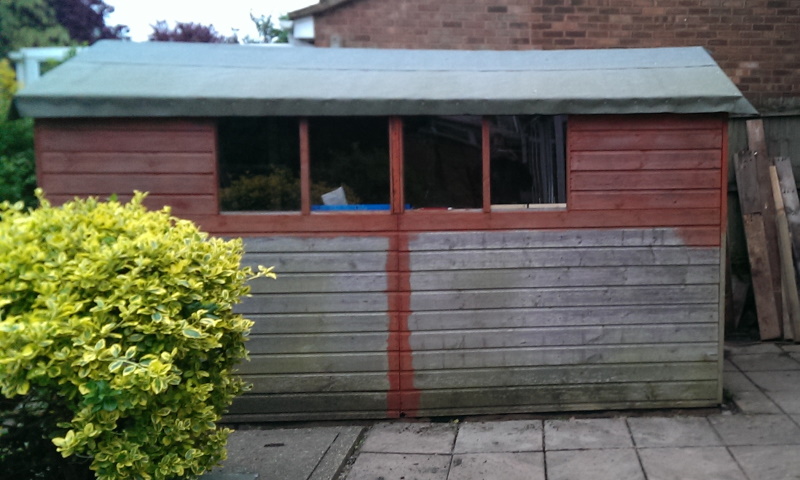
The current house has a shed, a whopping 6′ x 8′ and those missing 4 feet make a big difference. There’s not enough room to get anything in, and it is full of bikes, a lawnmower and general garden weaponry. Moreover, despite being relatively watertight, it’s over 15 years old. So the obvious solution is to build a bigger shed. Longer, wider, taller and warmer. But there are one or two problems with that idea.
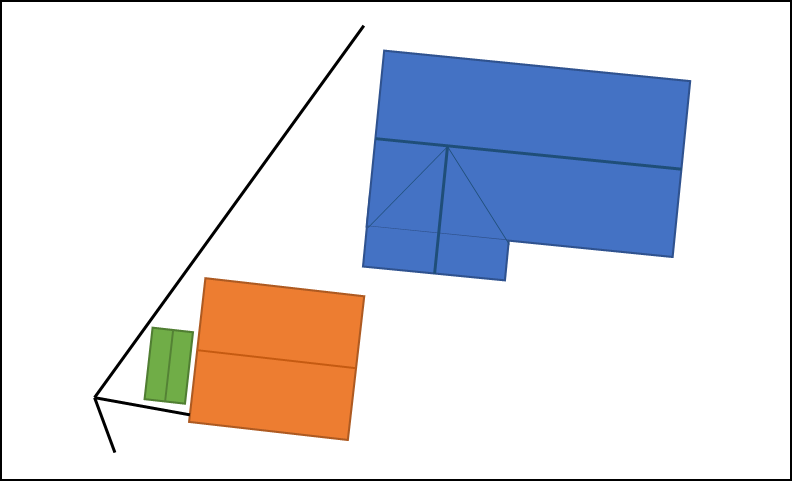
The plot on which the house and garage sit is triangular. This shape means there is not much garden area but bits of land all over. The picture above attempts to show the plot and the problems with it. The house, in blue, stops any access to the rear garden, whilst the garage, in orange, doesn’t have much land around it. The shed, in green, sits in a decent space, but it’s triangular! Have you ever tried to order a triangular shed? People look at you like your mad.
Designing a Mega Shed
The Plot Area
I’ll be honest, there have been a lot of part designs over the last few years, and I’m not going to bore you with them. So instead, I’ll jump to the result and try to show some of the decision processes I went through to get there. The first step was to grab an old envelope, a length of timber and a tape measure and try to get an idea of the space I had to play with. These scribbles then get thrown into a CAD program, in this case, Autodesk Fusion 360.
Fortunately, the fence that bounds the plot behind the garage has recently been replaced and is beautifully straight. The orange dotted line in the sketch above is a 30cm offset from the fence to give my maximum width. The 1.5m offset from the edge of the garage is pretty arbitrary, but it had a lot of consideration. Ultimately I need a 1.6m width across the front of the shed as a minimum to get a UPVC door in. Doors are about 80cm wide, and with a 40cm deep set of shelves against the wall as you go in, gives about 1.6m wide. How’s that for abstract thinking!
Designing the frame
I’ve put a few structural floors into houses in the past, and I’ve got a good idea of what I want for the base structure for the Mega Shed. Ultimately I want a wooden frame, raised off the floor, with plenty of insulation and more than enough strength to take some heavy tooling. I also want to have the fewest timber cuts and wastage possible. This restriction pretty much sets my maximum length at 4.8m. It’s another arbitrary limitation: I could sister beams to make them longer or order composite beams that were a bit longer. I want 40cm centres both for strength, and again, it helps with material usage.
Pretty quickly, I’m starting to get a plan together. Now, I must mention that this is a guide for assembly and material purchasing. So I’m showing 40cm gaps and not centres, and the flooring joists are aligned where they will be installed off centre. All in all, the design is starting to take shape. The problem I have is that I find CAD a little too stiff. It’s great for precision but far too slow for throwing ideas around. I have a cunning solution to that, though.
Getting the design off the ground
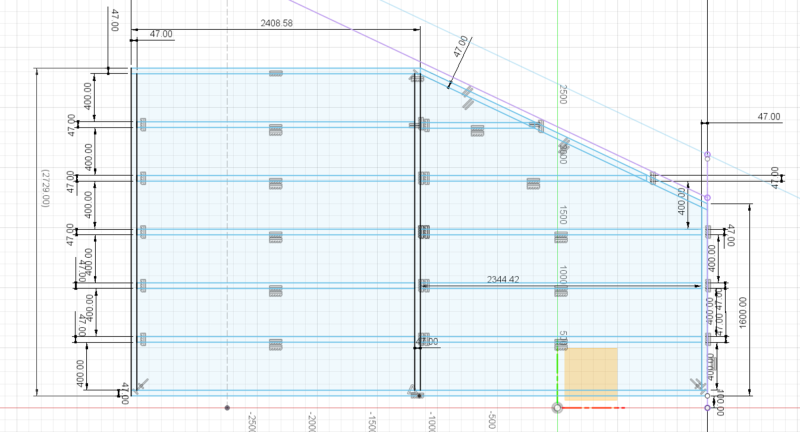
The next stage of designing the Mega Shed is setting it onto the ground. Something core to keeping the shed dry is keeping it off the floor. I will use concrete piers topped with steel plates to lift the whole shed clean off the floor. This construction should give a minimum of 50mm from the ground, allowing plenty of airflow to move moisture away. To know how many piers I need, I have to make a few quick calculations for where to put them and how many.
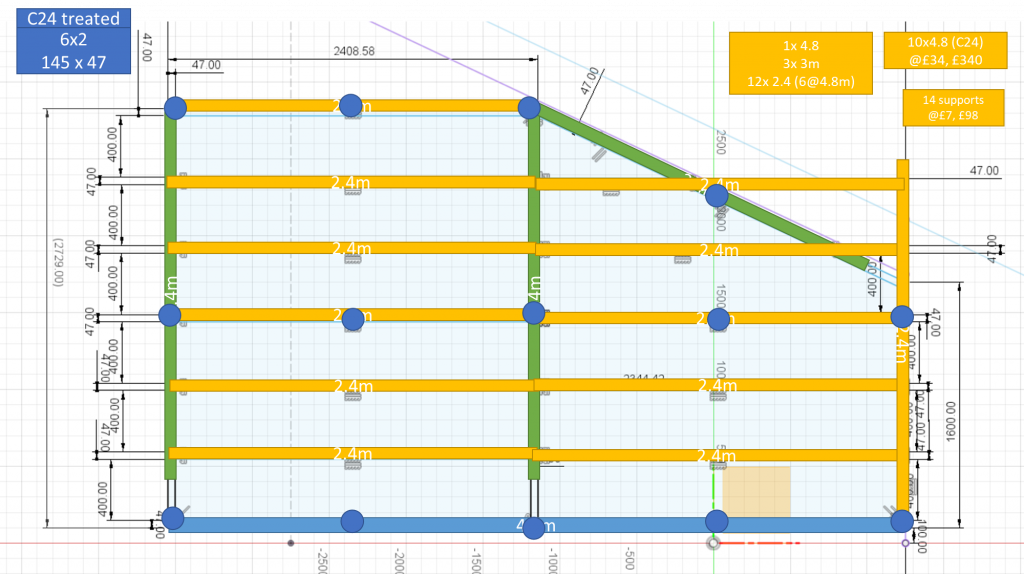
The image above shows the original structure, with some rapid design done in PowerPoint. Okay, it is not the prettiest drawing, but it is ideal for calculating how many piers I need and timber lengths. Quick and simple. The floor frame for the shed will be made in 2″ x 6″ C24 timbers. This timber size is a result of the span calculations. The maths for this is a little complicated, but ultimately this size of timber is more substantial than I need. The blue circles represent the points I’ll need the piers. A total of 14.
The three dimensional shed
For me, the frame design for the floor is the most complicated part of the design. I can pretty much think through the stud work on the fly. With a bit of experience, making frames is quick and rewarding. For me, the key is always to think imperial. With UK timber lengths and sheet material all delivered units of multiple feet, you pretty much just need to count in twos, and that’s it.
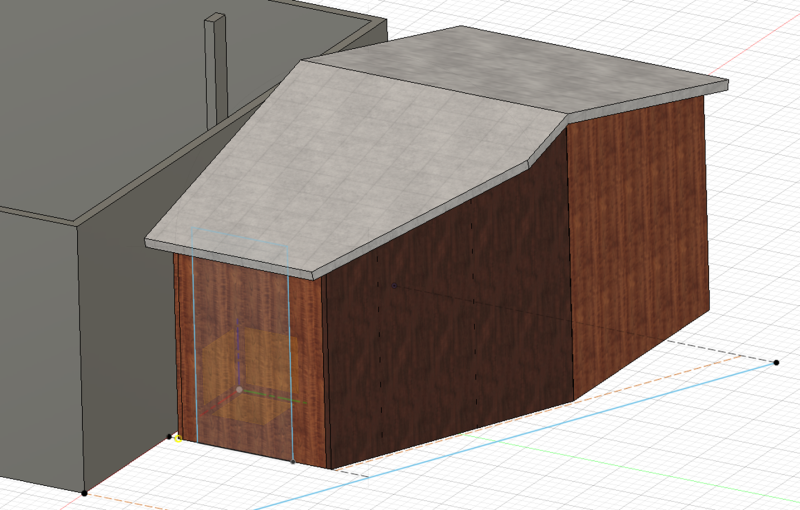
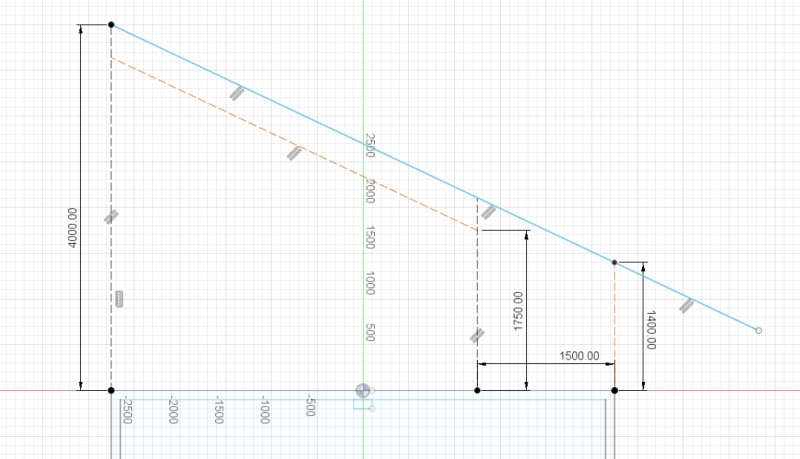
There are a couple of design elements undecided on, like windows and doors, but generally, I have enough information to throw the whole design into a 3d model. The maximum eaves height for a shed in the UK is 2.4m, so I need the front and rear edge of the roof to be under this height. I can take the roofline to 3.6m, but that is huge, and I think it will look daft. So this is a decision I still have to make, but if I work on a 3.6m height, I’ll have plenty of options once the materials arrive.
The bill o’ materials
Now that I have the basic design and some dimensions, I can think about ordering materials. Experience tells me that I will adapt the design as I build. I may find a buried pipe to work around or realise I have a measurement wrong. I need to add doors and windows at some point, and with so many secondhand UPVC windows available, the dimensions could be anything! No matter what I do now, I won’t get my materials order 100%.
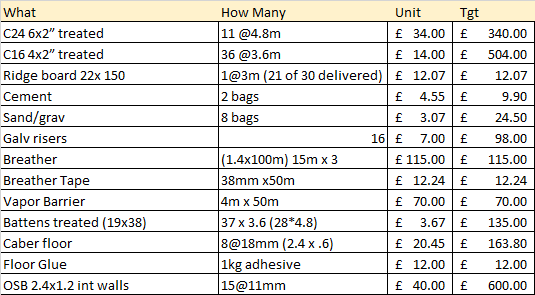
Rather than worry about what measurement is wrong or the element I have missed, I’m just going to have a dynamic bill of materials. The bill of materials lists all the parts I need to build the shed. I’ve also included a target price based on a few non-trade websites. Timber prices are currently through the roof, so there is an excellent opportunity for saving on costs by using discounted or pre-owned materials. I’ll keep the bill of materials up to date as I go along.
Mission Statement for the Mega Shed
It may sound like super cheesy management nonsense, but I like to have a mission statement for a big project like the mega shed. It helps make design decisions if the goal has some limitations or boundaries. I’ve already mentioned some of the boundaries, such as limiting the design to standard timber sizes. But there are a few other elements to the design which form the mission statement.
Height – Sufficiently high that I don’t have to duck under anything
Mega Shed Mission Statement
Environmental – The absolute minimum of high carbon generating materials
Materials – As locally sourced, and environmentally sound as possible (open to definition)
Thermal – Easily and cheaply heated. Well insulated for all year use
Lighting – An area of natural light is a must
Didn’t I say this was cheesy? And it is a bit cringe-worthy even as I write it, but it’s already helped me make some decisions. For example, things like cladding, while not bought, will be wooden. Plastic would last forever but looks awful and isn’t great environmentally. Steel, usually plastic coated, lasts a lot longer than wood but does generate a lot of CO2 in manufacture. And so, the mission statement steers me to timber cladding. Similar material decisions are also simplified by having a mission statement for the mega shed.
And how much will this Mega Shed cost?
Anyone who has ever watched Grand Designs will know that no building project ever hits the budget. Costs always creep. I also have no idea how much a Mega Shed of this type would cost. So I’ve had a look around for off the shelf alternatives. Something like a cabin site office from Portable Space would tick most of the design requirements and cost £8,300, probably before delivery.
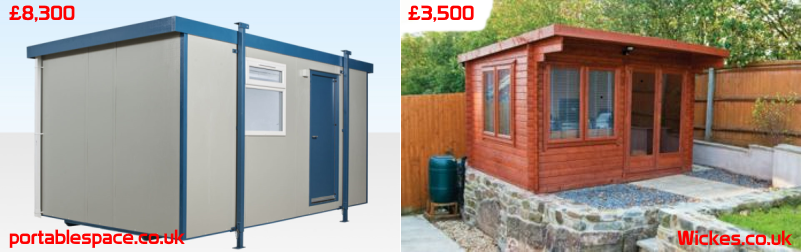
Garden offices have become a big business in the last few years, and now there are hundreds of companies offering off-plan and bespoke designs. The closest size to my plot offered by Wickes is the “Shire Danbury 14 x 12ft Home Office”. It’s a lightweight design and mentions nothing about insulation and costs a meagre £3,500. That’s quite a price variation! In reality, I don’t have £8,300 to spend, so I will set the Mega Shed budget to £3,500. Totalling up the BoM so far, without cladding or a roof, comes in at over £2,000. I suspect my spend limit will go the same way as most Grand Designs, straight out of the window, but let us see!
Whats next in the Mega Shed adventure?
Well, now I’ve designed something close to what I think will work the best, I can start shopping for materials. With a wealth of local stockists, I’ll need to do some shopping around. I also have the cash flow to manage. I’ll need to spread the spend over a couple of paychecks. I’ll also continue designing the Mega Shed and think about the assembly. Ultimately I want the Mega Shed complete before I go back to work in the new year. It’s a big ask, but you’ve got to have goals!
Until the next episode
M
Next – Part 2: Clearing the Site
Back to Mega Shed Articles
Back to Workshop Articles
One Comment