One of the common tasks for any Citroën BX owner is to replace the instrument cluster bulbs. A few weeks ago I came across an article on the Tramontana Citroen DIY website called ‘LEDs Everywhere‘. The author chronicles the steps taken in changing all the interior lights in their Citroën XM to an LED variant. What would the performance difference be between the filament T5 originals and more modern LED bulbs on the BX?
Why change to LED?
There are up to 27 of the T5 shaped bulbs in twist-lock lamp holders on the BX instrument cluster. The whole instrument binnacle needs to be unmounted to access them, not a complicated task by the standards of a modern car, but an unwelcome hassle. It’s not uncommon for blood to be spilt!
My aim in replacing these bulbs was to maintain the feel and character of the original. I want to still be able to dim the background lighting and have no significant increase in overall brightness. Ultimately I want to never have to find another blown bulb!
Which bulbs to plant?
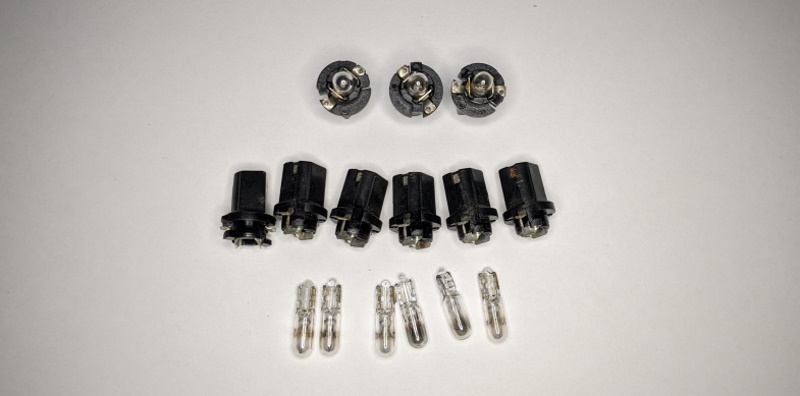
The Tramontana post points out that there are two ways to convert the bulbs, replace the glass bulb alone or replace the whole socket for an LED variant. Changing just the bulb is the far easier option in my opinion, so this is what I went for.
Having done some research on the topic of converting to LED I was aware that replacement bulbs are often brighter than their filament equivalent. This increase in brightness seems to result in colour wash out if the display has a coloured filter. In the case of the BX the background illumination has a green filter layer over the white bulbs, so I’m expecting to need green LED bulbs.
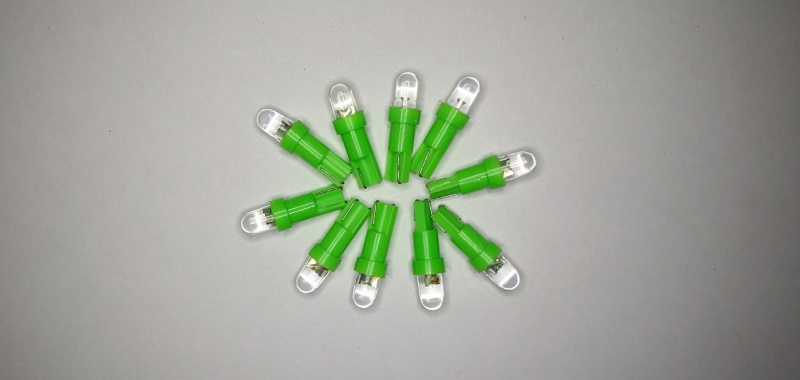
With this in mind, I went for a search on eBay and found the bulbs in the picture above [eBay link]. They seem to fit the bill. Green illumination, T5 fitment, and as a pack of 10 for £3.50 they certainly wouldn’t break the piggy bank!
Taking a baseline
To be able to compare the new bulbs to the original, I wanted to get a good image of how the instrument cluster background lights look in their factor condition.
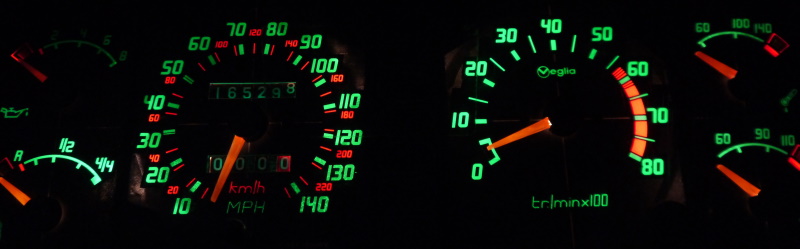
After checking all the bulbs on this spare instrument cluster, I moved the good bulbs to fill all the spaces for the background lighting. Unfortunately, I didn’t have enough bulbs left for the oil gauge in the top left. I think it worth noting that the clear perspex facia is still installed in these pictures, as it would be in the car.
The picture above is accurate to what I see with my own eyes. The camera is focussed on the ‘100’ position of the speedometer. The ’80’ of the rev counter really is that much brighter on both this spare instrument cluster and in my car. I think this is a result of the relative position of the bulb. In the case of the rev counter, the bulbs are directly behind the numbers while the speedo has the bulbs offset. Notice that with the filament bulbs the needles are all red in colour.
Testing out the LEDs
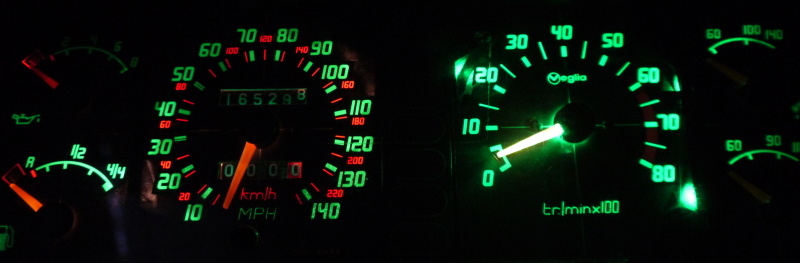
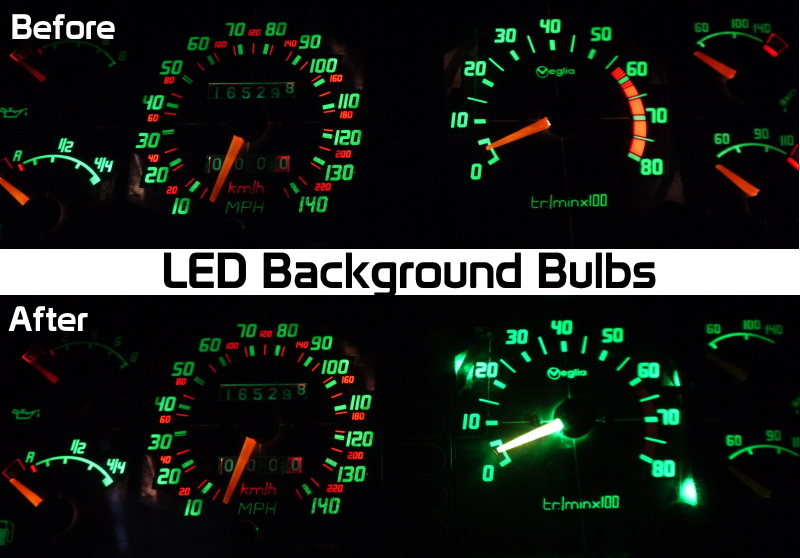
To give a good comparison between the LED and filament bulbs, I replaced only the right half of the background bulbs with the new LEDs. I think its quite clear from the picture above, it didn’t give a very good result!
The LEDs are simply too bright. This has resulted in all the red filtered parts of the display being washed out. There is now a lot of bleed-through areas in which light should pass. Notably around the ’20’ mark and below the ’80’ mark on the rev counter. Not surprisingly these bulbs are non-dimmable, so unlike the originals, reducing the voltage does not reduce the brightness.
The green of the LED is also a different shade to the filter element of the display and has given the digits a sharper more neon feel. Perhaps this is what the engineers at Citroen envisaged given the popularity of Vacuum Fluorescent Displays (VFD) in the 70s. Personally I prefer the warmth of the original lighting.
Fixed brightness light positions
Along with the dimmable background light, the instrument display has some fixed brightness bulb positions. These are notification or warning symbols, mostly in the centre strip. Most have a red coloured filter, but a few are green including the indicator and dimmed beam notifications. Perhaps the LEDs would be suitable here?
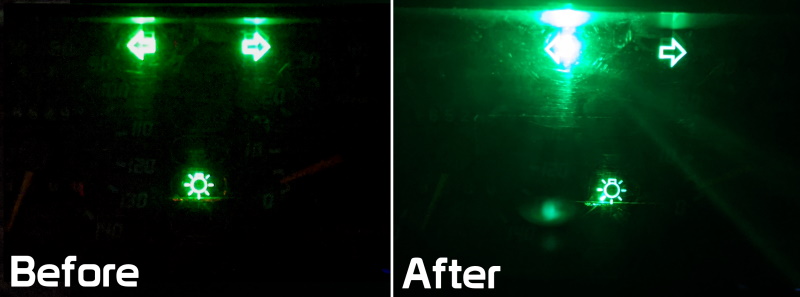
The picture above shows the green notification symbols with filament bulbs used for illumination on the ‘Before’ side. On the ‘After’ only the left indicator bulb has been changed to LED. Again the pictures are quite representative of what I see with my own eyes. The LED is simply too bright. Being directly behind the arrow logo, too much light is coming through the filter and refracting on the perspex cover. The cover is scratched, but no more than any other 30-year-old car!
The verdict
Well, that didn’t come out as planned! These bulbs are simply putting too much light out through the filter. The green is also too different from the original colour, I much prefer the softer original colours. The bulbs aren’t dimmable, but it wouldn’t be too much hassle to convert the sized voltage to a PWM output to make the LEDs dimmable.
I have found a number of other LED T5 bulb designs, some with four or more LEDs around the side of the bulb rather than directly on the end. This may help with the intensity of the brightness when the lamp is directly behind the green filter. A warm white bulb might also give a more factory appearance.
I’m disappointed I didn’t get the results I had hoped for, hopefully you can learn something from my misadventure. I’m not done with this idea though, I’ll find some alternative LEDs and try them!
M