
Believe it or not, the telling of the heater tap overhaul topic has been ongoing for eleven years. Originally started in 2012 on the BXClub forum, it has taken until 2023 to finish the series. And why has it taken so long? Well, a mixture of busy life, and a lack of enthusiasm, and I have to confess I lost the bag of ‘spare’ heater taps. Like many people, I’ve often wondered how the final article would appear, and now I shall wonder no more!
The article is broken down into several parts;
- Disconnecting the heater tap
- Removing the steering column
- Removing the heater tap and heater matrix
- Disassembling the heater tap and refurbishing
Parts of this article were originally published on the BXClub forum back in 2012
Recap on heater tap overhaul
Through part one of the heater tap overhaul series, we disconnected the hoses under the bonnet and started disconnecting the Bowden cables inside the cabin. Then In part two of the story, we started to improve access around the heater tap unit before beginning to unbolt the valve block itself.
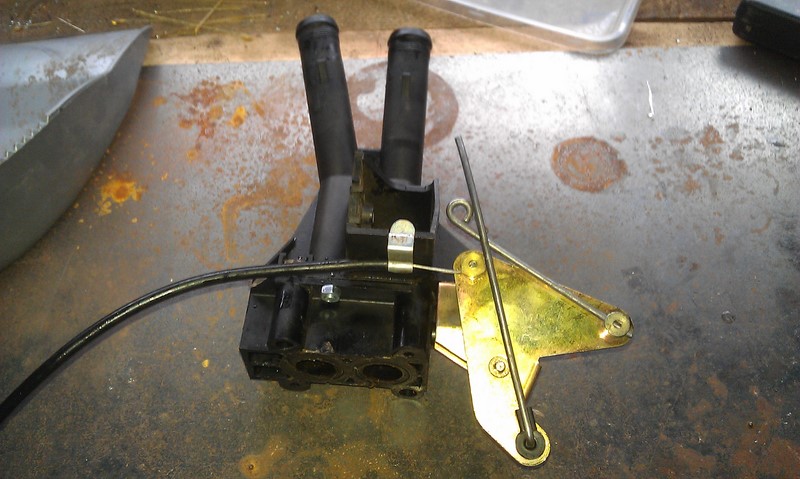
By the end of the third article, we had the heater tap completely free of the car and on the workbench, ready to start disassembly and repair. Despite eleven years having passed, I still have the tap shown in the pictures above. It had already been hastily repaired once but had developed an ever-so-minor leak. The original valve from my Citroen BX was replaced in 2011 with a brand-new original part. Part number 95 576 548 if you’re feeling lucky.
Disconnecting the valve from the pipe tails
Although I replaced my leaking tap with a NOS part when I last tackled the job on my car, it is far from the only heater tap I have rebuilt! While I wouldn’t consider myself the expert, I have some experience dismantling and successfully rebuilding the tap. So take the following advice as it is meant, a helping hand.
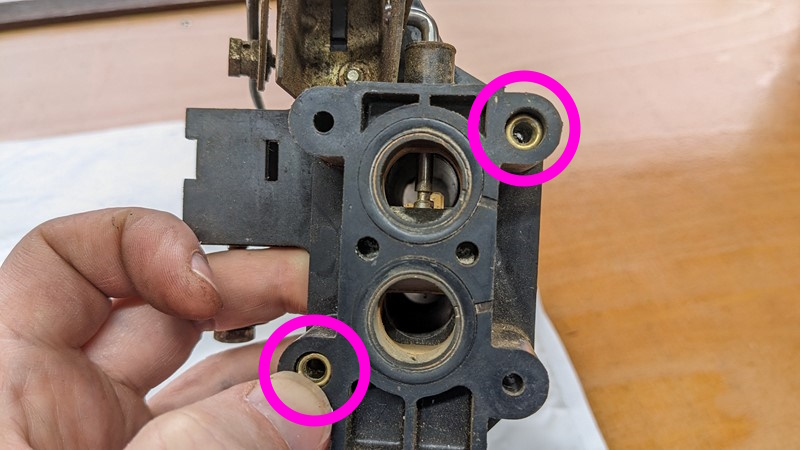
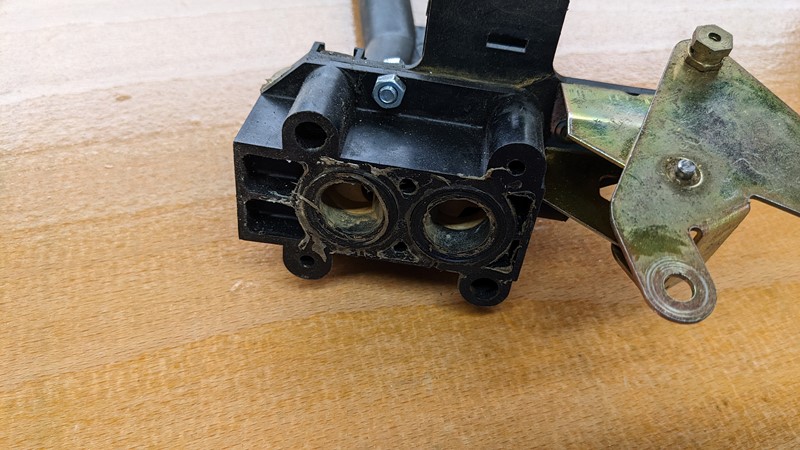
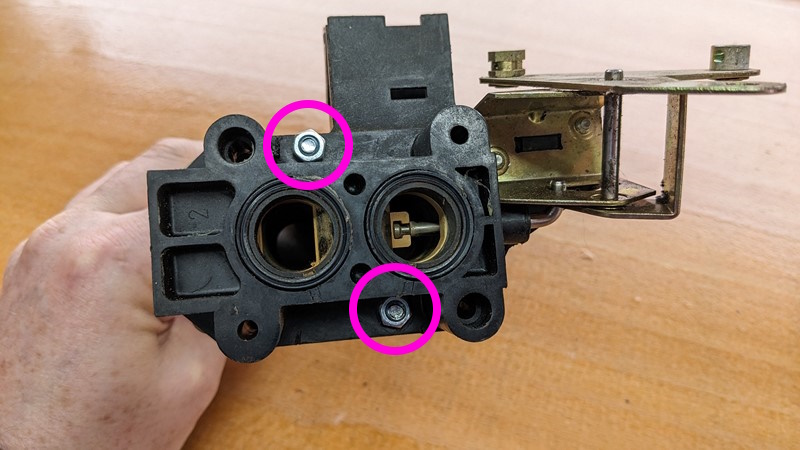
Initially, I assumed that removing the four long bolts that connect the heater matrix to the tap assembly (highlighted pink) would be enough to free the tap. How wrong I was! The valve block and pipe tails are held together with two hollow rivets.
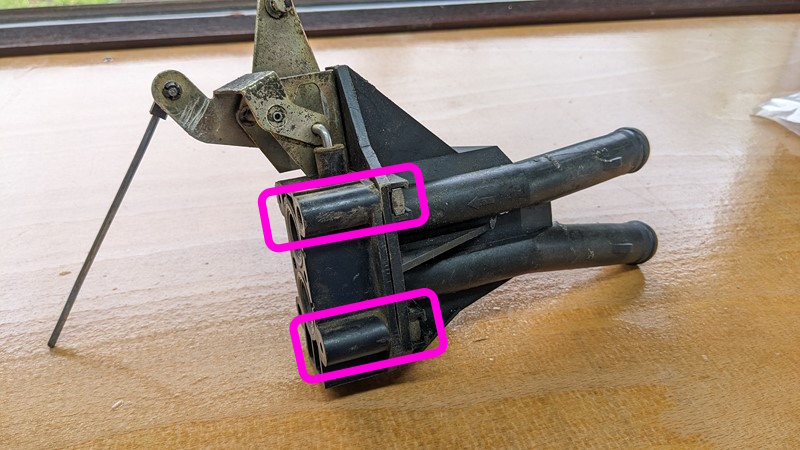
The picture above has the two hollow brass tubes highlighted in pink. You can see the ends of the thin brass tubes that have been curled over at the top to form the rivet. The bottom of the tube is likewise curved on the outside edge of the pipe tail.
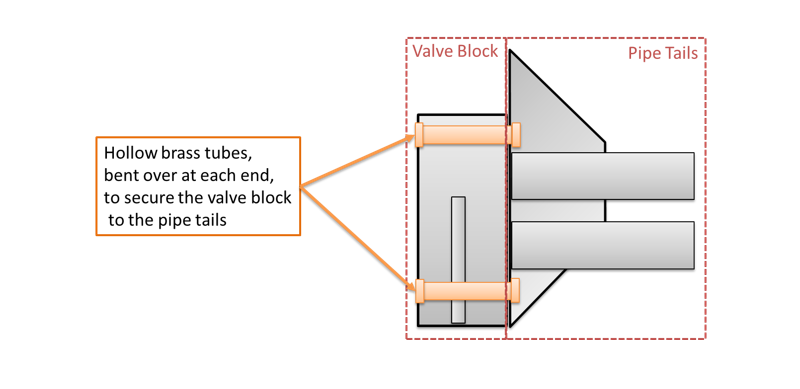
Hopefully, the diagram above makes more sense than my nonsensical hammering. I presume the two parts of the heater tap need to be secured together so they can be reassembled in a service setting. During the manufacture, the HVAC unit is installed, followed by the dashboard. But removing the whole dash for a heater matrix replacement would be rather expensive under warranty!
Separating the heater tap parts
So, the obvious question is, how to separate the valve block from the pipe tails? Fortunately, that is a relatively straightforward task. Apply a wide flat-headed screw drive at the two areas marked in pink below and gently twist.
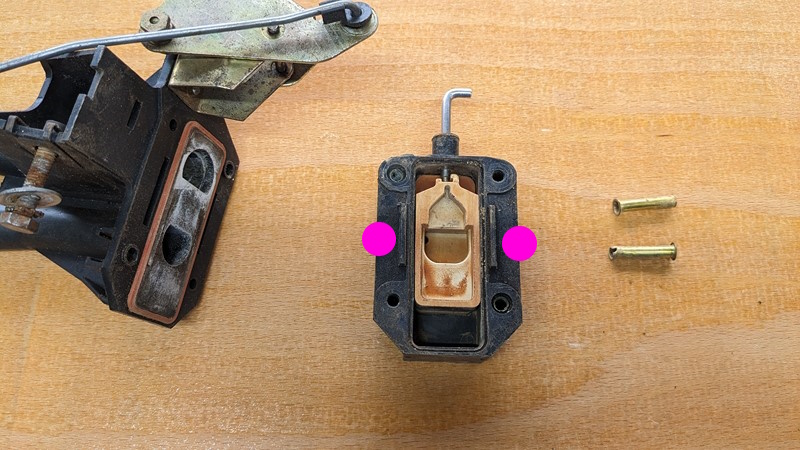
So long as you go carefully, one or other end of the brass tube will straighten, and the two parts of the assembly will be freed to go their own way. The picture above shows a set of rivets and how they end up after being pulled apart. In this case, reassembly is not the opposite of removal, but we will come to that.
The cause of heater tap jamming
If you set about reading the series of articles because your heater tap was stuck open, then I may be about to offer insight as to why. I made a terrible mistake in the early days of having my Citroen BX 16Valve equipped with one of the many diesel engines. One of the engines was failing, destined for the bin, and had a suspected head gasket. So I made the fatal mistake of trying to buy time by using K-Seal.
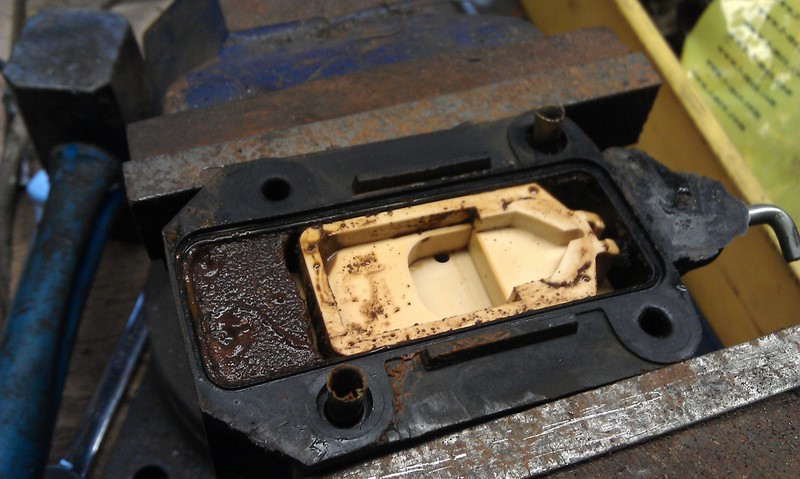
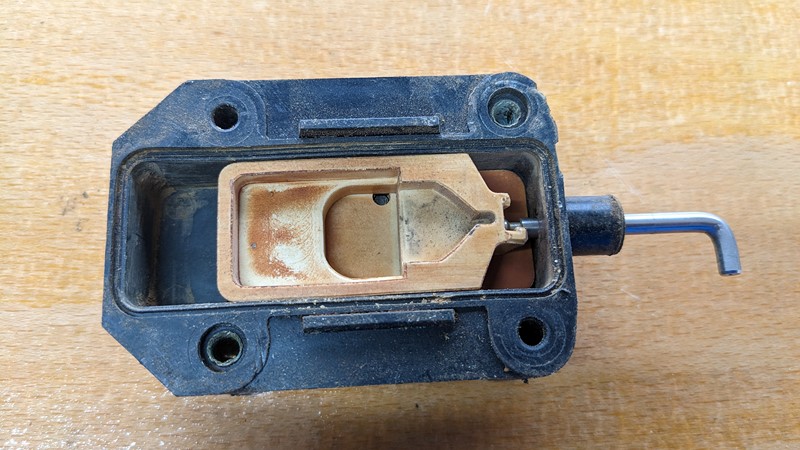
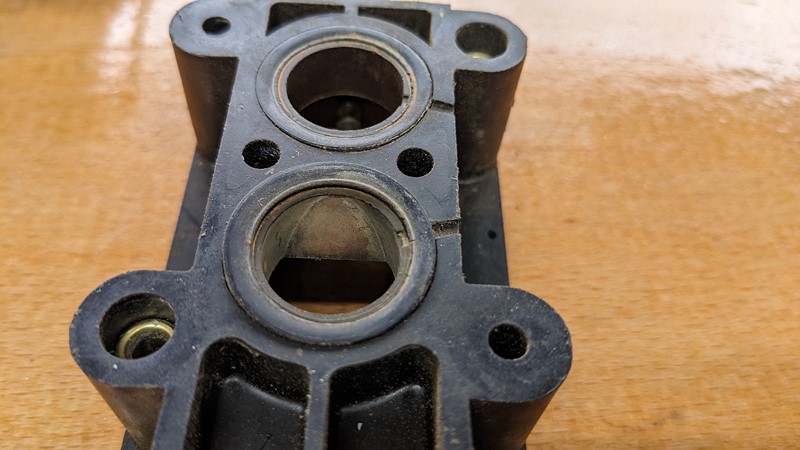
K-Seal is absolutely useless, in my experience. While designed to flow into gaps in a head gasket and seal them up, it doesn’t. I would go so far as to say it has ruined more cars than it has helped. It might get you home, but plan to scrap the car when you put it in the coolant. The picture above is a completely jammed heater tap that has spent many years as a strainer collecting K-Seal from the coolant.
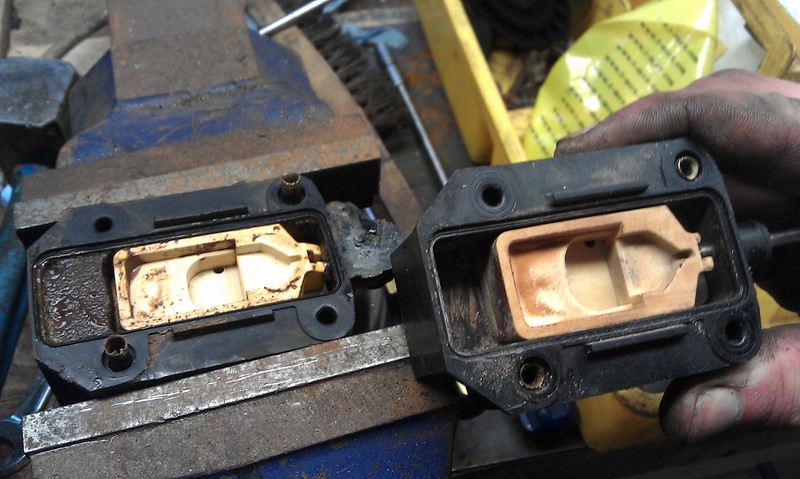
The picture above shows that the left valve block is wholly jammed with K-Seal, while the right hand has been cleaned. It is hopefully apparent that with all the sand and chemical grit blocking the valve chamber, the white slider has nowhere to go!
How Does the Valve Block Work?
Hopefully, the operation of the valve block is quite apparent. However, it will help to understand the failure mode if we quickly look at how it works. The ‘valve’ is simply a gate that slides up and down and opens or closes a passage between the heater core and pipe tails.
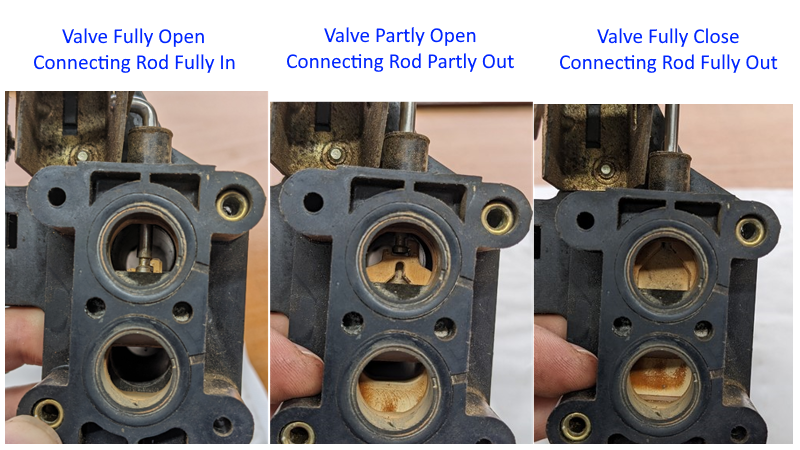
There are two parts to the sliding gate, which we will look at in more detail shortly. First, however, it is essential to recognise that the sliding part is a strong but brittle ceramic. Such a fragile material is meant to avoid expansion when hot, which would stop the gate from moving.
If the valve block is full of debris and you force the dial on the dash, the weak point is the top of the gate which will snap off! Also, the Bowden cables don’t tend to stick, so don’t force the temperature dial if it doesn’t want to turn!!
Dissecting the valve block
Let’s look at just what is inside the valve block using plenty of images.
First up is the sliding gate. You’ll notice this gate has the top section, next to the actuation rod, snapped off. The funny shape in the gate, which is on the tail side, is a bypass allowing some hot intake water to flow straight through to the cooled outlet water. While it may seem pointless, it does help with fine temperature control.
Below the sliding gate is the fixed gate. This piece has a locating hole that matches a plastic lug in the housing to keep the gate in place and ensure it is installed the right way up.
Below the fixed gate are two very flexible ‘seals’. I am loathed to call them seals as they are too thin and flexible to apply any proper sealing. The read seals sit in a groove in the plastic with the fat side away from the plastic. So really take up any variation between the hard flat ceramic and the plastic housing that will change shape with heat.
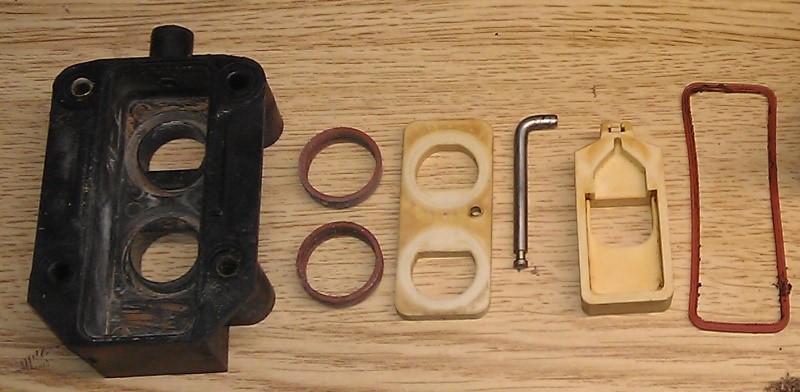
The picture above shows pretty much all the parts in the valve block and the order (left to right) that they should be assembled. Such a simple device compared to modern electromechanical equivalents. There is one more set of seals . . .
Heater Matrix Seal Failure
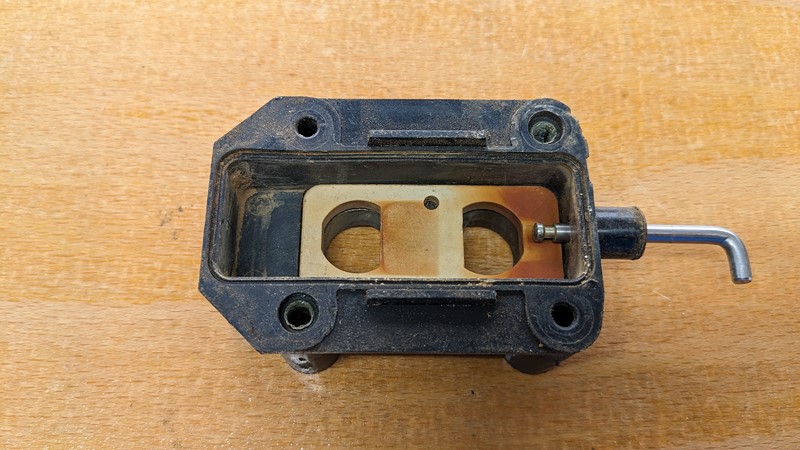
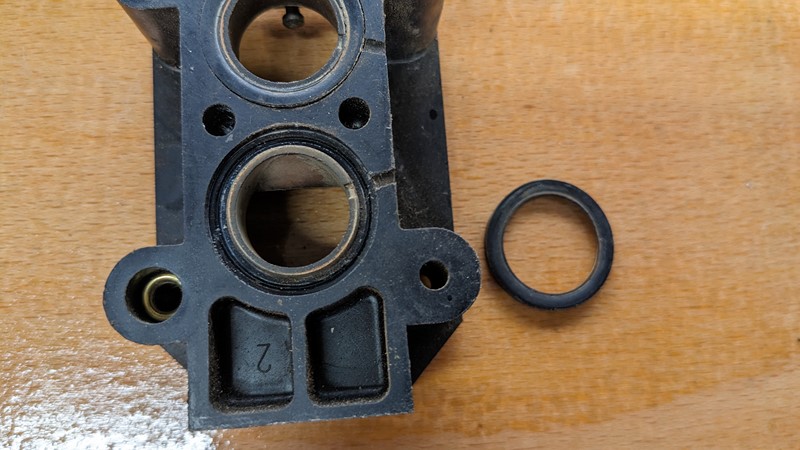
Another common failure for the Citroen BX heater tap is the seals between the heater matrix and the tap assembly. While they look like a relatively simple o-ring seal, don’t be fooled. After up to forty years of temperature cycles, these rubber seals have very much lost their newness.
The image above shows a not uncommon ‘bodge’ to get the heater tap leak free. Rather than take the heater tap off the car, the tap assembly has been disconnected from the heater matrix. More than likely, this was done without even uncoupling the pipes in the engine bay. Then some sealant was squirted in, and the tap and matrix bolted back together. Super bodgery that generally won’t work.
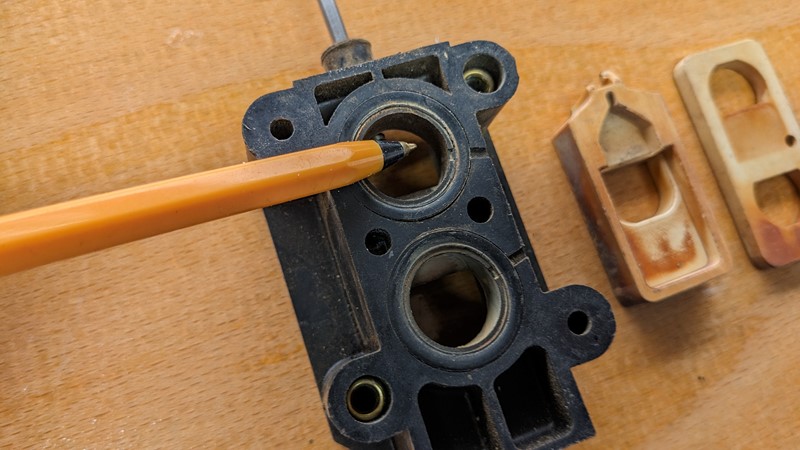
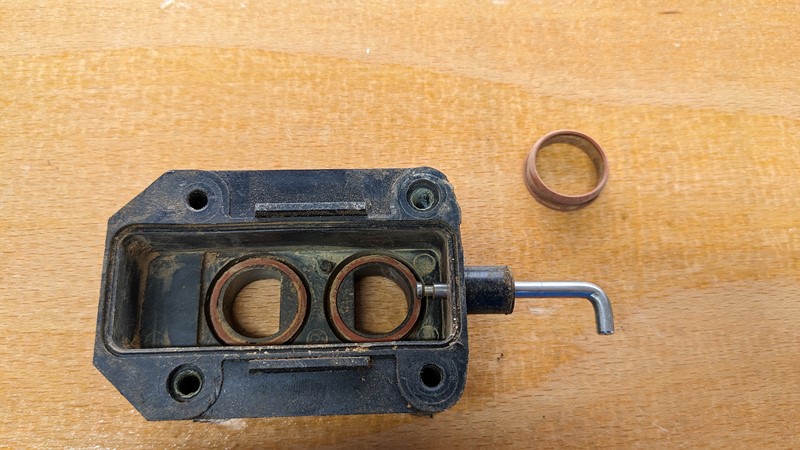
The very handy biro in the picture above points to the troublesome seals. In this example, these round black seals are incredibly ‘dry’, brittle and showing signs of cracking.
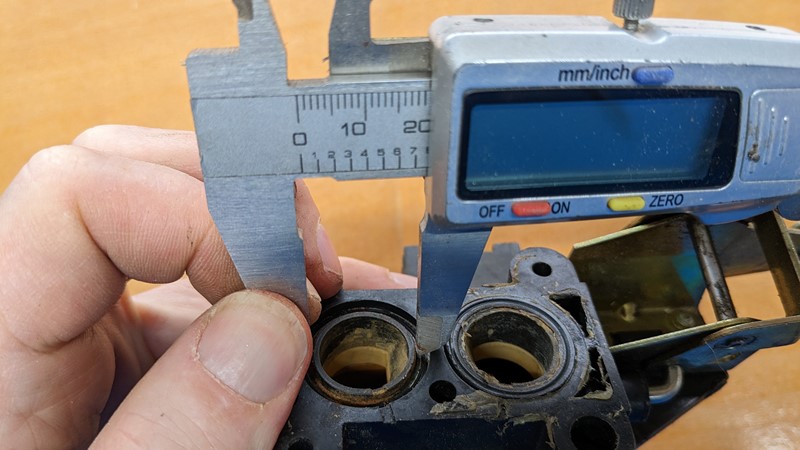
To remove the seals, great care must be taken to lift these seals evenly. Any twist as they are listed will result in catastrophic failure. For example, in the picture above, I have slowly teased the seal up by about one millimetre all the way around.
A small rib is in the bottom of the channel in which the seal sits. This, I believe, is to help keep the seal firmly pressed against the heater matrix housing. The rib allows some seal deformation while keeping it a little bit proud.
Can the heater tap seals just be replaced?
I mentioned earlier that these seals are not simple o-rings. While the top and bottom of the seal are domed with a slight radius, the sides are flat. The doing helps make the seal, while the flat sides and high tolerance ensure the seals stay in place during assembly.
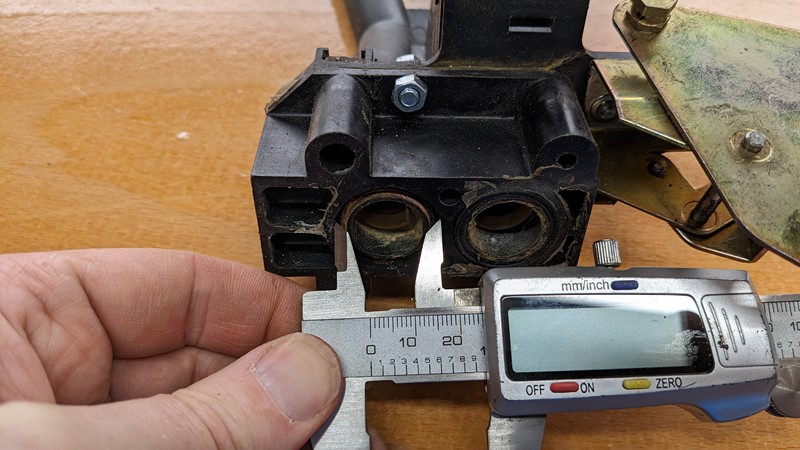
Some quick measurements of the hole give an idea of what size seal is needed.
The outside diameter is 25mm.
The inside diameter is 20mm.

And the depth of the hole to the rib measures 2mm, so the replacement seal needs to be 25mm OD, 20mm ID and a thickness of 2.5mm. Fortunately, as luck would have it, 20×2.5mm O-rings in Viton are a standard size but only with a round profile. I’ve never found straight-walled seals of this size.
The obvious question is, how do I resolve a leaking seal? I start by removing the old seals without breaking them. Then I put a small amount of instant gasket in the bottom of the groove to a depth of about 0.5mm. I then put the original seal back in upside down. The instant gasket gives some flex and pushes the seal out while the groove in the seal face that is now facing outward gives something to seal against.
Heater Tap Reassembly is not the opposite of removal
If you have got this far with the heater tap overhaul, you’ll be keen to get the valve block and pipe tails assembly back onto the car. However, this isn’t as simple as it might sound! Remember those brass rivets we removed? Without the two halves of the heater tap clamped together, the assembly is rather tricky to reinstall.
I’ve tried a few solutions to this problem in the past. In theory, with a lathe, it would be possible to machine a mandrel to put the turn back on the brass pipe and restore the rivet. But, unfortunately, I’ve not had a lathe to turn the mandrel nor the skill to turn the convex shape. So my solution has been more straightforward: drill some holes and put a nut and bolt through the flange.
These nut and bolt fixings only aid assembly, so they do not need to be overly tight. Once the four main bolts are in place, these rebuilding aids can be safely removed if you want to.
Summing up this heater tap overhaul saga
While this final article in the heater tap overhaul series has been a long time coming, I hope that this will help you on your journey. Although some of the steps are tricky, the overall task of overhauling the heater tap is something anyone should be able to tackle.
But whatever you do, don’t force the tap, and don’t put any load onto the heater pipe tails.
Good luck, and let me know how you get on!
M
PREV – Heater Tap Overhaul – Part 3
Back to Citroen Articles
Back to Automotive Articles
Amazon Affiliate Links – Things used in this article
BXProject is using Amazon Affiliate Links. It’s a quick way to show you what I have used in this article.
“As an Amazon Associate, I [may] earn from qualifying purchases.”
Since January 2024, Amazon has blocked embedding images, but I think the links are still valuable.

[…] Disassembling the heater tap and refurbishing […]
A useful note for anyone looking for seals in future, Ashton Seals seem to have everything you might need. Never used them myself, but they have helped BX owners in the past
https://www.ashtonseals.co.uk
[…] PREV – Heater Tap Overhaul – Part 4 […]
Nicely explained, thanks
Try here- http://www.fpeseals.com
Hi FPE Seals, do you think this is something you could help with? Not sure when I’m next due in Darlington, but maybe something you could have a look at?
M