

Since I bought my Citroën BX 16Valve in 2003, the 16V bumper trim has always been missing. Well, that’s not entirely true, as I recalled after seeing the pictures of the original eBay advert. When I collected the car, the front bumper was in the car’s boot. Back then, half of an insert was still on the left-hand side of the bumper, but that was it.
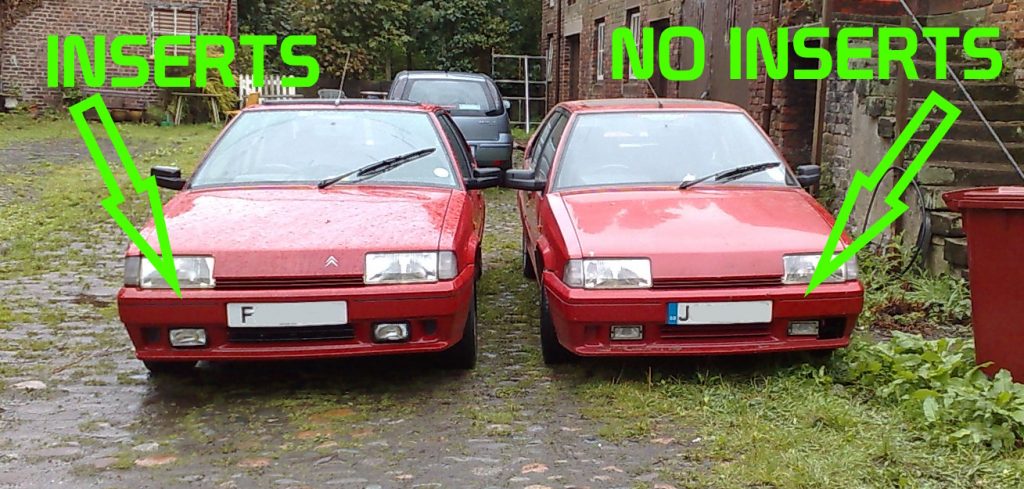
Rather critically, the insert is unique to the BX 16Valve bumper. The PVC fills the groove in the bumper to bring a styling line around the whole car. Fortunately, the rear bumper on Jazz is original to the car and has the insert. However, the front bumper without the trim has always looked odd to me. Fortunately, after some serious effort, I have finally managed to get the 16v bumper trim remanufactured!
The Long and Winding Bumper Trim Saga
In July 2012, I bought a silver BX 16V (J603 LLP) for spare parts. The front bumper was resprayed and fitted to Jazz. It turns out it was about the softest paint imaginable, but I shan’t dwell on that now. However, the respray triggered the start of getting the 16v bumper trim remanufactured. Fortunately, I could save some of the trim from the silver bumper.
Over the last twelve ish years, I’ve lost count of just how many companies I have contacted. Be it by email or spoken to at shows. UK automotive trim suppliers had close matches, but nothing looked quite right once installed in the bumper. Unfortunately, I would need to have the BX 16v bumper trim manufactured from scratch.
How to accurately draw the bumper trim?
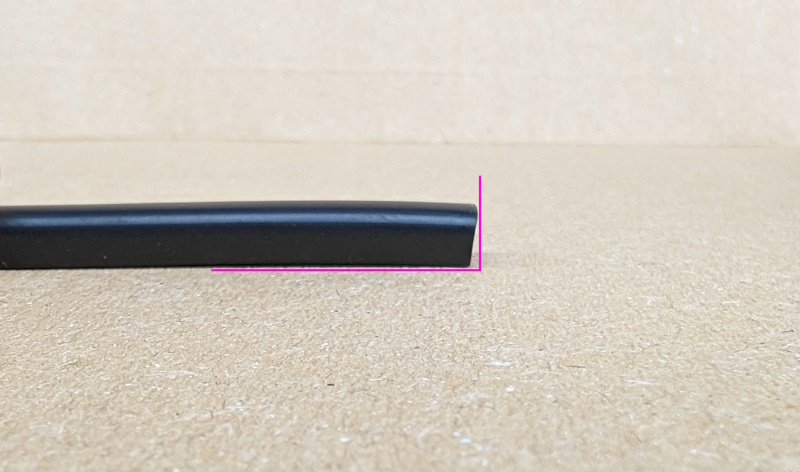
The first obvious question trim suppliers always ask is about dimensions. Giving overall dimensions of 7mm x 4mm was okay to find something off the shelf. However, to have something manufactured from raw material would need a far more accurate drawing.

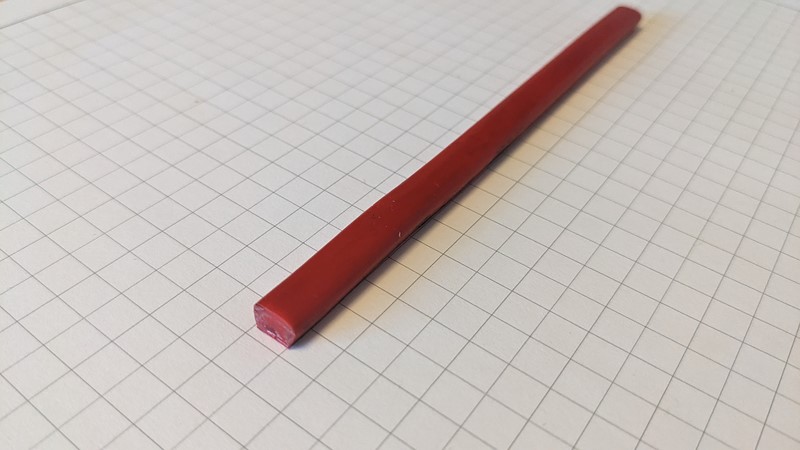
Over the years, I’ve tried a few different ways of measuring the trim. A radius finder (plastic guide with different curves cut) suggested the shape was inconsistent. As you can see above, I tried cutting slices and taking pictures with various success. But ultimately, the best solution was a fine slice and a photocopier.
Digitising the 16V bumper trim image
Once I had a decent image, I could digitise the shape of the trim. As usual, I’m using Fusion 360 to capture the shape. While I can trace the shape, I’m also using a Mitutoyo callipers to make sure the dimensions are correct. I should mention that I haven’t used a single piece of trim, but multiple trims and multiple sections.
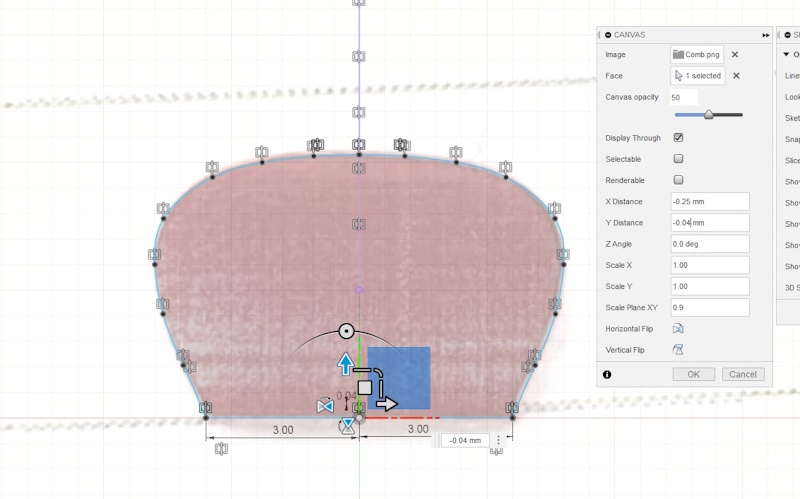
Between the multiple slices and detailed measurements, some things became apparent. My original observations that the trim wasn’t perfectly symmetrical seemed correct. However, I could not tell if the lack of symmetry was because of the age of the sample or by design. Regardless, I decided to create the reproduction trim symmetrical. This should save some effort figuring out which way is ‘up’ when installing.
Testing the drawing
The digitised image of the bumper trim was all well and good, but would it fit? The obvious solution was to print it out a length on the 3D printer. The obvious material to print with would have been something soft and a little flexible. However, I only had PETG to hand.
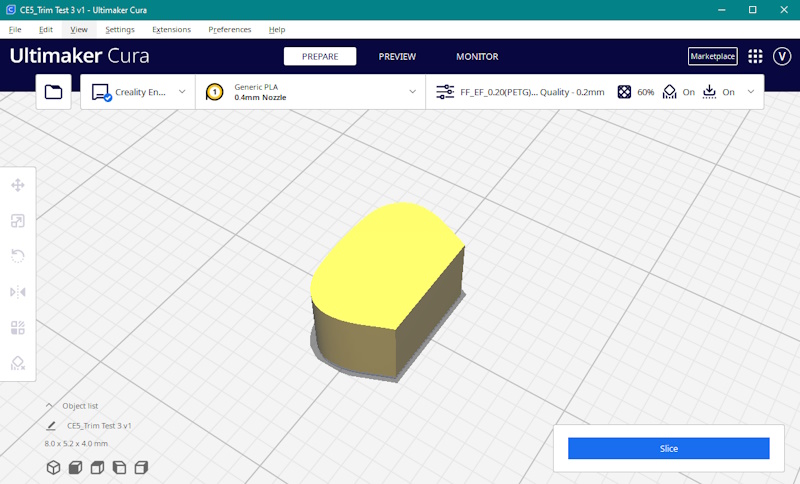
Once printed, the short sample piece is perfectly dimensioned to the original sample. When offered up to the original PVC trim, it was hard to see the slight variations in dimensions. Rather foolishly, the 5mm of the printed sample wasn’t enough to test in the bumper groove. However, the fit was perfect once a longer length was printed out.
Finding a Supplier
Very few suppliers have been interested in manufacturing a short run of trim. Not because of the volume of used material but because of the bulk purchase they must make. One UK supplier did manage to arrange with their raw materials supplier to get a ‘small volume’ purchase. A minimum order of 250kg of raw material for red and black would be enough for a few miles of bumper trim. The small volume comes with a penalty, but the actual cost is the disposal of the excess material!
I’ve only made good progress with one UK supplier in ten years. Like many other manufacturers, the relatively simple die would cost between £600 to £800 to machine up. While this seems expensive for a hole in a metal plate, the cost is pretty good.
However, once the cost of materials, short order penalty, leftover material disposal, postage and manufacturing costs are considered, the piece price is impossible. The final cost was around £70 for front and rear trims. Perhaps not too expensive per set. However, there are a limited number of sets of BX 16v bumper trim that I can sell. More critically, the upfront investment was huge and not something I could finance.
Getting the new bumper trim to the UK
Once long ago, in a time before Brexit Island, moving things from mainland Europe to the UK was straightforward. In fact, I would go so far as to say it was easy. I’ve sent entire interiors from cars and received hundreds, if not thousands, of parts in return. In the last few years, however, the process has become more and more arduous. It’s not impossible, but it’s excruciating. Getting the bumper trim back to the UK would not be simple.
The trials the tribulations of FedEx
The first big problem is that the transfer of goods into the UK has become something of a farce. It is so much of a circus that many leading couriers will no longer entertain the idea. While my record with DHL is nearly unblemished, they simply won’t take the risk. Neither would the more expensive and less reliable UPS. In fact, on this occasion, FedEx was the only courier that WOULD collect the parcel and bring it to me.
As a rule of thumb, FedEx is more hit than miss, but I know I’m in for a battle when they miss. The last-mile delivery guys here are perfect, and as long as they get the parcel, it gets delivered. But they have to receive it first! On the 15th of December, I booked the parcel for pickup on the 18th of December. The collection was made ahead of time, but that would be the last time FedEx would be ahead.
Duties and taxes

As expected, I received the bill for the import duties shortly after collection. I say ‘expected’ because I had already filled in the paperwork and knew how much it should cost. The bill was spot on and was paid on the 19th of December. So far, so good!
Later that afternoon, I got a call from FedEx’s clearing house to clarify some details. The call ended with the agent telling me I would receive the duty bill by email. No amount of pleading that I had already paid the bill (the same amount) seemed to help. Sure enough, a second bill for the same amount landed.
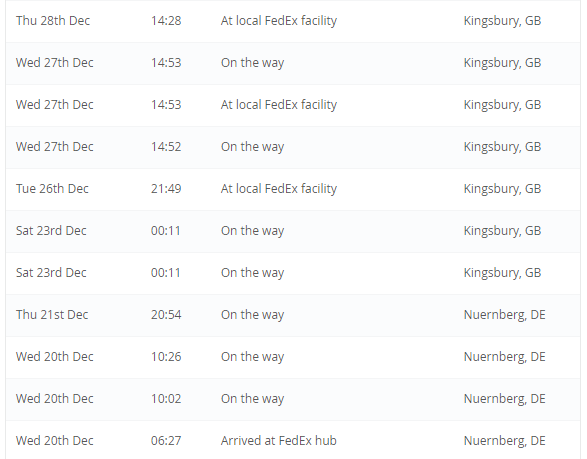
By the 22nd of December, the parcel was at East Mids airport and sent to ‘Kingsbury’ or, as I call it, Tamworth, for final dispatch. And that’s where it would stay. FedEx customer services acknowledged the payment and said no further payment was needed. However, the expectation was for me to resolve the issue with their internal clearing house. Queue the A-Team music for a montage of calls and emails. Threats from FedEx that the parcel would be returned if not paid were less than enjoyable.
Finally it arrives
After many unanswered emails to GTS Clearance at FedEx, something rather unexpected happened on the 3rd of January. A text message from FedEx stating the parcel would be delivered the following morning. At this stage, I’d had no reply to any emails, and this wasn’t the first ‘we’re delivering your parcel email’.
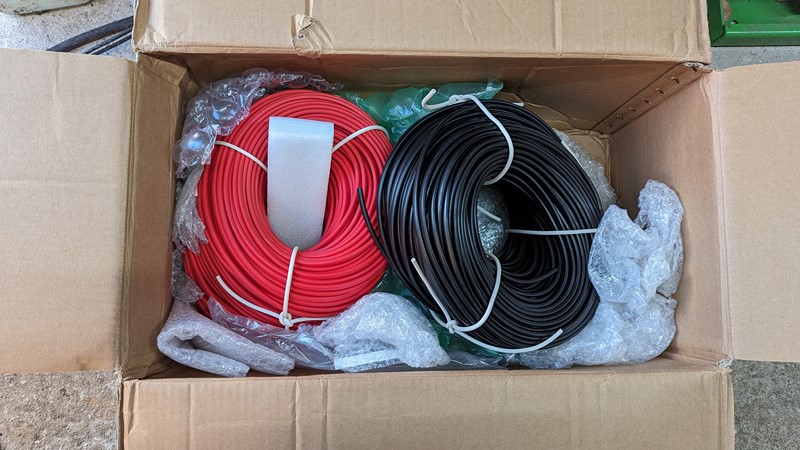
On the 4th of January 2024, around 10:30 am, a FedEx van pulled up at the end of the drive. A Christmas miracle. The poor driver had no idea what to do with my excitement. When I blurted out that ‘I’ve been waiting ten years for this delivery’, he may have taken it incorrectly. Sure enough, on opening the package, there was the bumper trim, and it was beautiful!
Installing the trim
Strangely, I didn’t immediately rush out and fit the trim. In fact, it would be just over a month before I finally found the time to get this plastic joy installed. Not through lack of desire. However, the car, or at least the bumper, would need a serious cleaning before installation could start!
How much trim?
Unfortunately, the Citroen parts catalogue didn’t tell me how much bumper trim was needed for each section. I whipped out the trusty tape measure to know how much trim was needed. Being a metric car, I expected to find relatively metric lengths of trim that would be required.
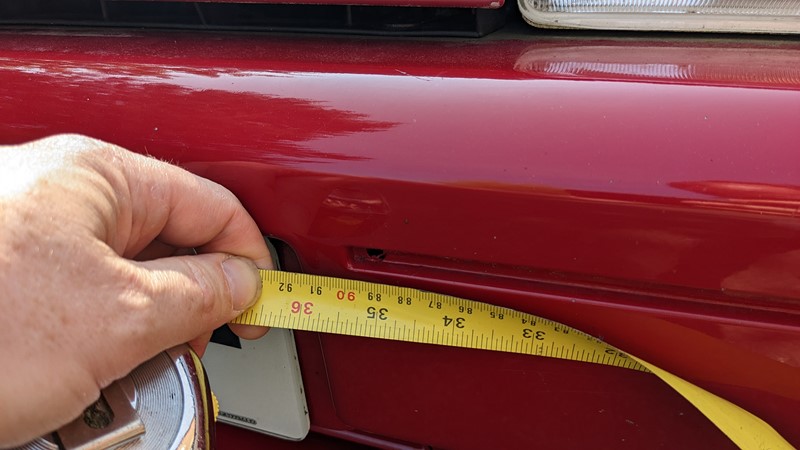
Sure enough, around the two front corners of the front bumper, the length was just about 900mm. So far, so good, and always reassuring to get a reasonable measurement. A nice round number is always comforting.
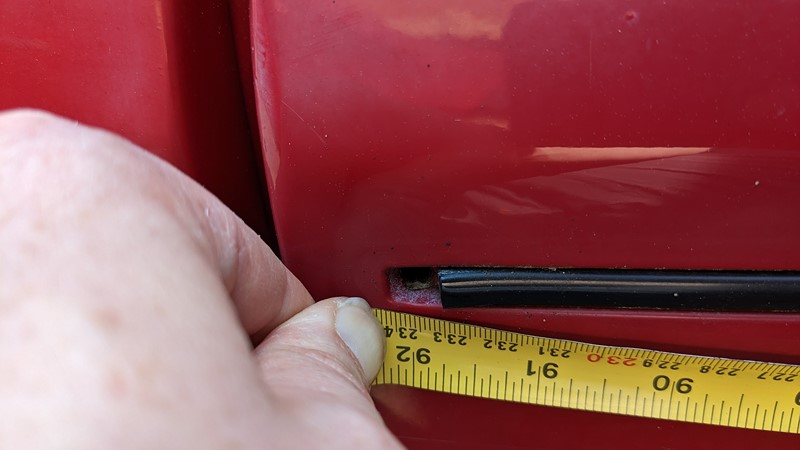
However, around the back bumper, the length seemed a little odd. Again, 2340mm was a nice metric number, but somehow, 2350mm seemed more balanced. Fortunately, I have two BX16Valves to hand and a couple of spare front and rear bumpers. Measuring all of these and the original number were confirmed.
The final dimensions

| Ref | Part Number | Description | Length |
| 3 | 96064983 JX – RED 96064983 XY – BLACK | FRONT BUMPER MOULDING, RIGHT | 900mm |
| 4 | 96077726 JX – RED 96077726 XY – BLACK | FRONT BUMPER MOULDING, LEFT | 900mm |
| 2 | 96064984 JX – RED 96064984 XY – BLACK | REAR BUMPER MOULDING, | 2340mm |
With all good reproductions, I find it a good idea to reference the original part numbers and drawings. This should help to identify how much material is needed. It also makes it easier to find the part numbers through a Google search.
Making the bumper trim cut
The reproduction BX 16V bumper trim inserts are supplied in a continuous length with an amount of excess. The long lengths need to be trimmed down to the correct size. I would recommend doing this with measurements on the car. In my case, I cut the flat end first, then marked up where to cut the angled end.
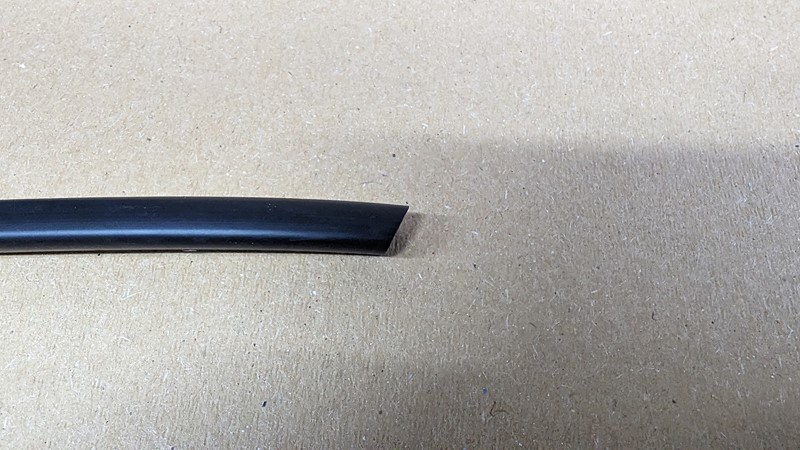
One thing I did notice while installing the trial parts is that the shape of the cut matters. A small backcut on the trim makes the final result look much better. The image above shows how a 1 to 2mm backcut can be achieved.
At the other end, getting the angle right to fill the gap is critical. I put tape on the back of the trim and offered the long length into the groove. I then lightly marked the top and bottom of the trim where it needed to be cut. Away from the car, the final angled cut was made with a small back cut.
Offering Up
Once trimmed to length, the front bumper inserts where offered up to the car to temporarily check the fit.
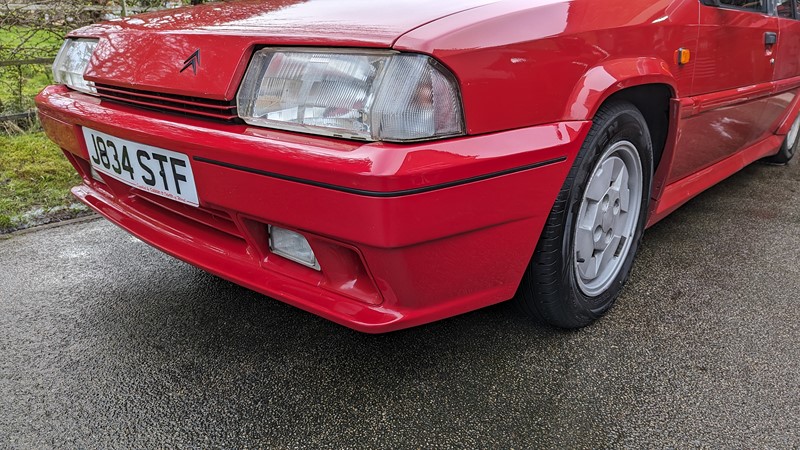
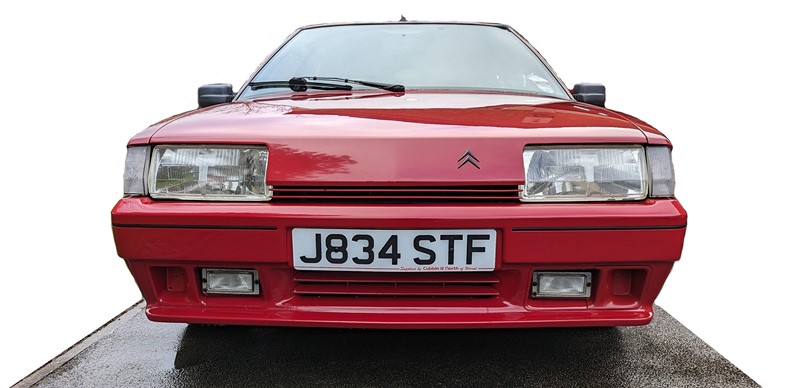
I can’t tell you how happy I am with the final result. The culmination of 10 years of on and off work finally coming together. I am surprised at how much of an aesthetic difference the small piece of PVC makes to the car.
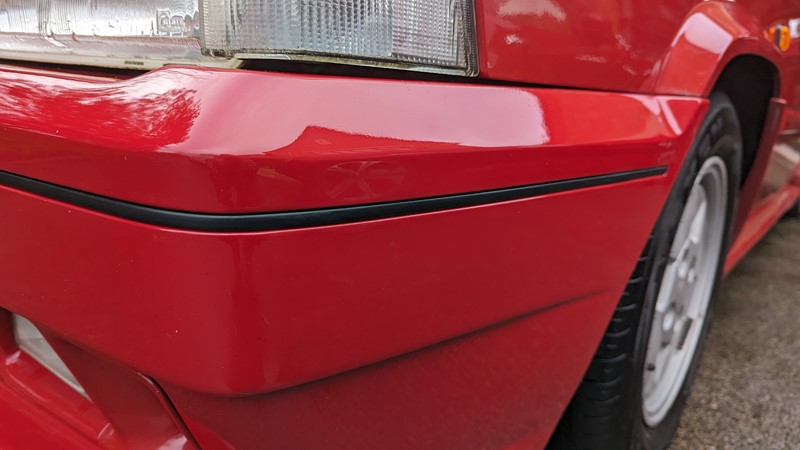
While I shouldn’t be surprised about the fitement, it’s perfect. The finish of the material is less shiny than the rear bumper. However, I’m told by those that remember that the finish should be less shiny. The lack of gloss finish makes the bumper’s red ‘pop’.
Sticking it down?
I’m not a trim-ologist, but 3M VHB (Very High Bond) is the place to be. I use this exact tape for blue light installations. So long as the surfaces are properly cleaned, I’ve never had a problem. However, since installing the trim onto my BX, I have covered zero miles!

A word of warning about buying the tape, there are a LOT of fakes in the market. The tape should be sold under the ‘Scotch Brand Tape’ branding; be wary if it only says 3M. I recommend buying from reputable sellers as well. I’ve been using Canopus (via Amazon) for about eight years, possibly a mile of tape by now. The tape itself comes in grey or black. I only fit black, but I have been caught out by accidentally ordering the wrong colour. Oh, and on my BX, I have used the 6.3mm wide tape.
The finishing touch?
The bumper trim was secured from the factorywith more than just trim tape. Moulded profiles were bonded to either end of the trim lengths. These mouldings have little tubular legs. The legs fit into holes in the bumper groove and are secured into place with a star washer. The fitment is the same as the bonnet badges.
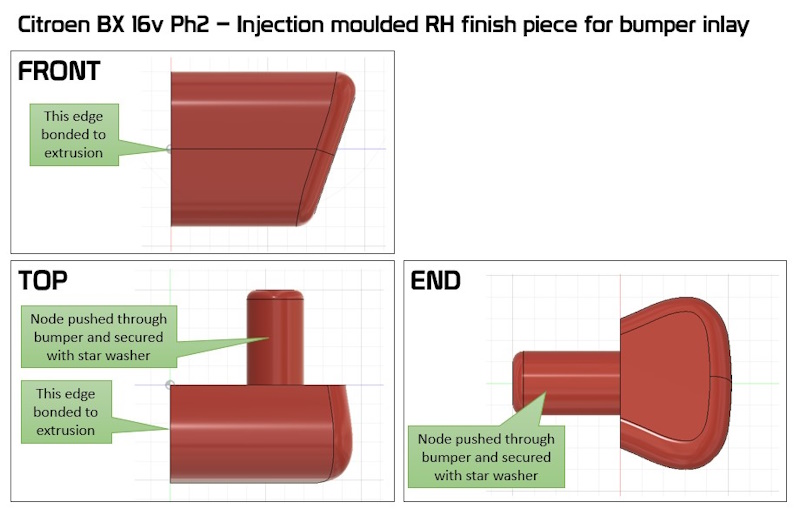
This makes a lot of sense, as the trim will likely start to peel at the ends, especially under high speeds. However, modern tapes are much improved, and I am confident the tape alone will be sufficient. I did look at getting the mouldings remade. There are three in total left, right and straight. The cost of each moulding would be around £2000 each. There would then be the same issue with ordering materials for such a small production run. So trim tape to the ends will have to do!
Requesting trim from BXProject
If you have read this far, the final obvious question is “where can I get the trim from”? Right now, all of the reproduced Citroen BX 16V bumper trim is in my garage. I’m happy to send it within the UK, but getting the trim back to mainland Europe is proving a little tricky.
I’ve set up a form at the bottom of this article to request a quote for the bumper trim. Please remember that I am not a business, and the trim is offered for the benefit of fellow owners.
Final words on the reproduction of the 16v bumper trim
While I’ve worked in automotive for years and had my share of procurement, this was not easy. Cost is governed by low volumes coupled with material costs and two colours. Just finding a UK supplier willing to discuss was difficult. I have a lot more respect for the effort that goes into the classic car market part reproduction.
Some or the additional history of the trim can be found on the BX Club UK Facebook page;
https://www.facebook.com/groups/bxclubUK/permalink/10162692708412571/
Despite the effort, the final result is fantastic. Well, for me, it is incredible. Finally, achieving such a long-term goal has been a great experience. I now have a lot of money tied into the bumper trim. However, I’m sure the finance side will all work out.
M
NEXT – BX 16Valve Front Bumper Bracket
More reproduction articles
Back to Citroen Articles
Back to Automotive Articles
Reqesting a quote for bumper trim
If you want a set, please use the form below to email the BXProject and include the follow details;
- full name
- UK postal address
- mobile number (for postal service)
- email address (for postal service)
- what you want a quote for (colour and number of sets)


Well done Vanny. I’m most impressed with you dedication – if only I had a 16v : )
[…] A chance conversation with a fellow long-suffering Citroen collector, and I had a couple of D’s to escort me down to Gaydon for the show. While the 6 a.m. service station meet-up felt rather painful for a weekend, what a fantastic way to travel. Although the BX looks rather clean, don’t be misled. Only the front bumper and one corner have actually been washed, and that was for the article on bumper trim! […]
[…] PREV – BX 16v Bumper Trim ReproductionMore Reproduction ArticlesBack to Citroen ArticlesBack to Automotive Articles […]
I see in your advert that you got both red and black bumper trim for the BX 16v. I have a black BX 16v and would like red trim in the bumper. Would you have enough red bumper trim and how much? Thanks in the meantime.
Roy Brown
Hi Roy, it looks like you found the eBay listing. Thanks for your purchase; it should be with you shortly.
M