
As I nudge closer to putting the engine back into XPO, I need to tackle a few engine bay jobs first. One of the glaringly obvious jobs is the steering rack boots, or gaiters if you will, which are often a struggle to change. However, they’re a tad easier with the engine out, so I should probably crack on!
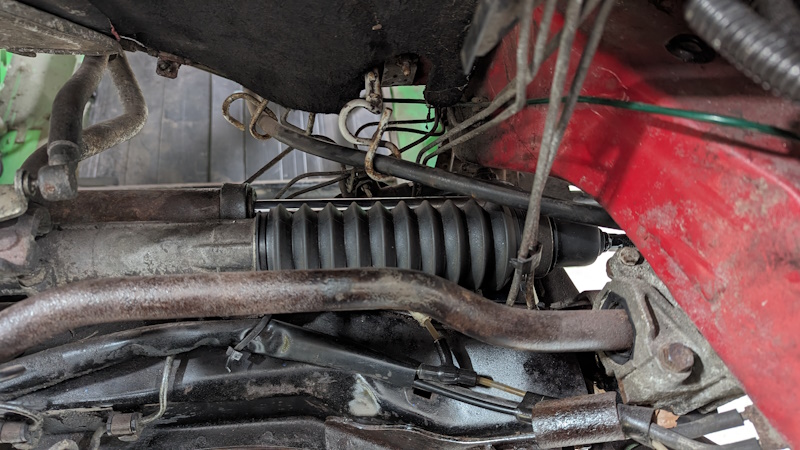
Perished steering rack boots.
Steering Rack Boots are a popular topic in the BX world. Partly because the ‘right’ ones are hard to find and partly because changing them is a pain in the posterior. Difficult to access, difficult to get on and off on the near side and to top it all off, the current aftermarket parts are too fat to fit.
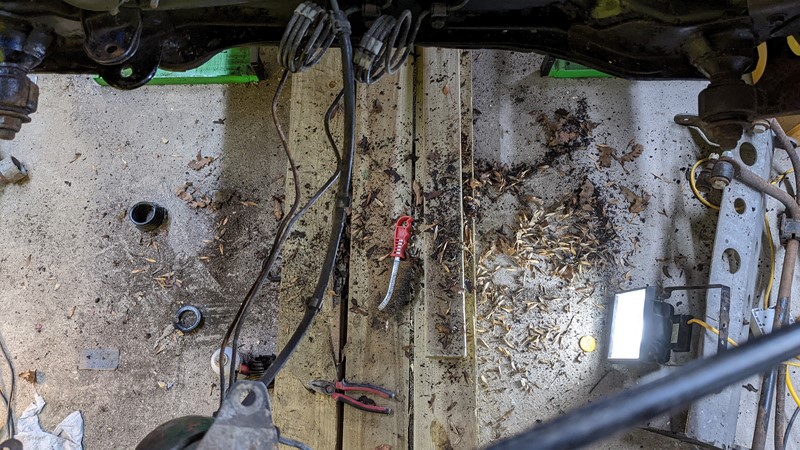
Unfortunately, there was simply no way to avoid the job on XPO. The boots have seen better days and, in places, grown up and left home. While there is no surprise that 30-year-old plastics have deteriorated, the filth around them may not have helped. XPO has been off the road since 2008, and the front subframe is sporting a very fetching garden.
Overhauling the Steering Rack
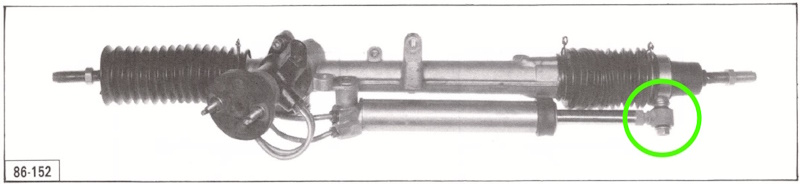
Unfortunately, the steering rack on XPO needs a little TLC, and not just the gaiters. The issues are minor, in line with age, but need tackling before the rebuild progresses. Let me walk you through using this handy coloured diagram.
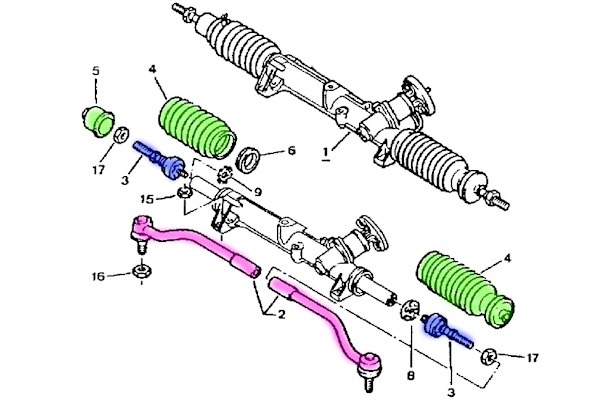
- All three steering rack boots/ covers (in green) are perished and exposing the chrome ram of the steering rack. Actually, number 5 is in okay condition but needs to be destructively removed to tackle;
- The inner tie rods (blue) are no longer tying much of anything together. The giveaway that they are past best is that they can’t keep themselves up anymore. And no amount of Viagra is going to help.
- Finally, the track rod ends aren’t too bad, but getting the buggers off the car could be an event all of it’s own.
Removing the track rod ends.
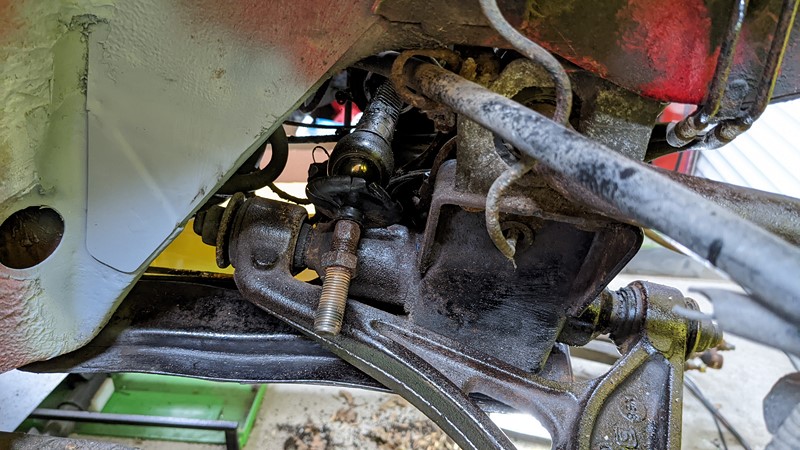
While there isn’t any obvious play in the track rod ends, they need to come off to replace the inner tie rods. And they are rather stuck. The nut holding the rod to the hub comes off easily, and using the right tool, the ball joint is freed from the hub relatively quickly.
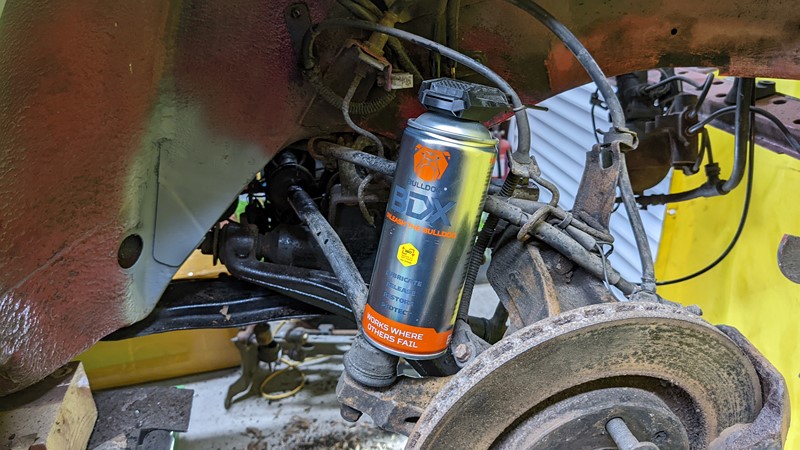
The inner connection, however, is quite the opposite. Normally, it would be quite tricky to access, but I have a lovely hack to accessing the lock nuts. Simple enough, just take the engine out! Oh, and a serious dousing of Bulldog BDX penetrating oil.
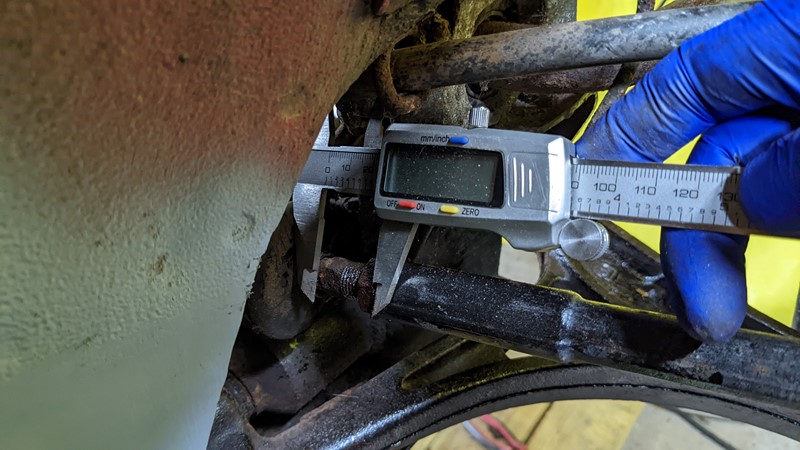
Just one more thing to do before undoing the lock nut and removing the track rod, measure the exposed thread. The length of exposed thread sets how straight the wheels point, so good practice is to try to put them back on in the same position, knowing the car will still need tracking.
Materials for steering rack boots
The steering rack boots can be quickly removed with the track rods removed. Well, to be honest, they could be removed quickly anyway, as there wasn’t a lot left. The original boots are a form of thermoset plastic, rather than ‘rubber’, as many modern cars are.
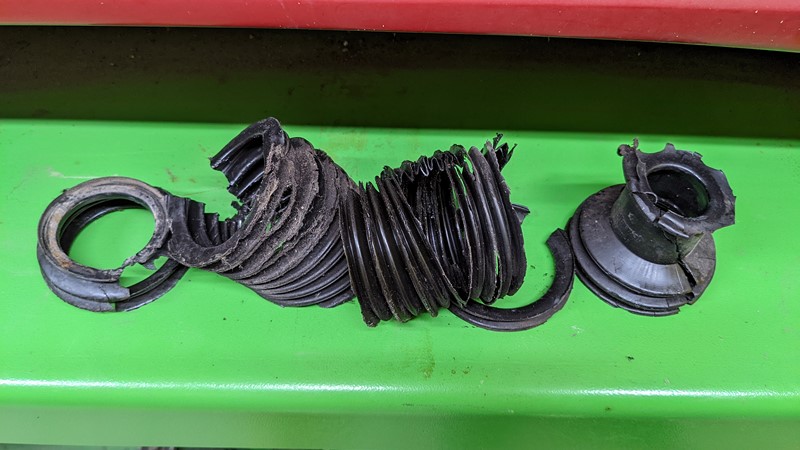
The steering rack boot acts like a bellow. The folds in the material allow the cover to compress and extend in length as the steering is turned from one side to the other. Part of the reason for the thermoset plastic is because the material can be thinner without losing any ‘stretch’. This means the compressed steering rack boot is shorter and more compact.
We’ll come back to this topic shortly!
Replacing the inner tie rod joint
I’m not sure I’ve ever had to replace the inner tie rod joint on any steering rack that was actually in the car. There was an argument for disconnecting the rack from the hydraulics, steering wheel and subframe and taking the whole lot to the workbench. I’m always loathed to take a steering rack out, though. So, changing the tie rods in situ would be a new experience. A giant set of stillsons was not going to work.
These are honestly the worst inner tie rods I have ever seen. The amount of play on the offside was ridiculous, to the extent it was hard to tell the rod was still connected to the cup. While the near side seemed to be able to hold itself up a little, I suspect this was only because it still had its steering rack boot on it!
Magical inner tie rod removal tool
It’s not often a tool that does exactly what it says on the label, with a minimum of faff.

While researching how to get the little blighter out in situ, I discovered this magical tool. Designed purely for removing difficult-to-access inner tie rods, the tool is a one-trick pony worth its weight in gold!

In principle, the tool is not much more than a captive cam. The more the ratchet is turned, the tighter the grab on the tie rod. With a good grip, the turning ratchet eventually releases the captive plate, and the inner tie rod becomes free. Despite the tricky access, the tool makes removing both sides easy.
Out with the old, in with the new.
Trying to find a good supplier for inner tie rods (95495440) was quite a faff. If I want a basic brand, shipped from Latvia for £35 then the availability is fine. Maybe I’m just old, but this used to be something I could get from SKF for under £8!
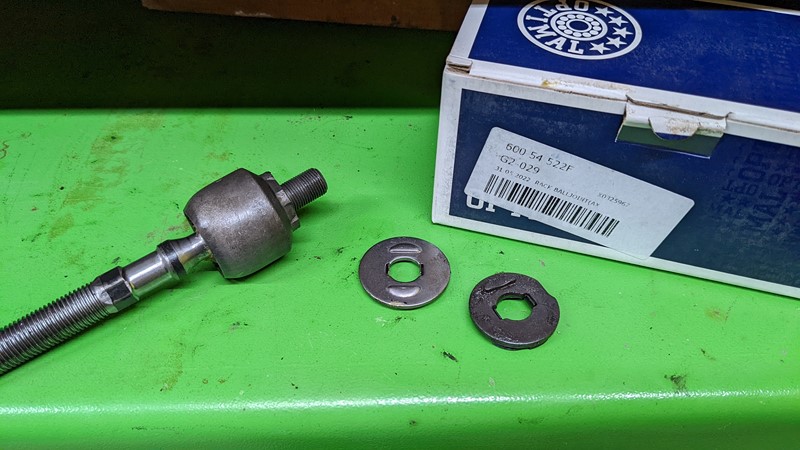
Likely not the greatest replacement brand in the world, but this ‘Optimal’ brand was the only inner tie rod I could get on short notice. The locking plate (not shown) was rather useless, but the old ones were compatible and reusable. The new ball joints can at least hold themselves up now.
Choosing a steering rack boot kit
The modern materials used in aftermarket steering rack boot kits are far more flexible, and a lot thicker. This means they bunch up and pop off. There’s not a lot of point in me trying to explain it with pictures. Certainly, there is no point in trying when Kitch of UpNDown YouTube fame has done a cracking job of explaining and showing the issue.
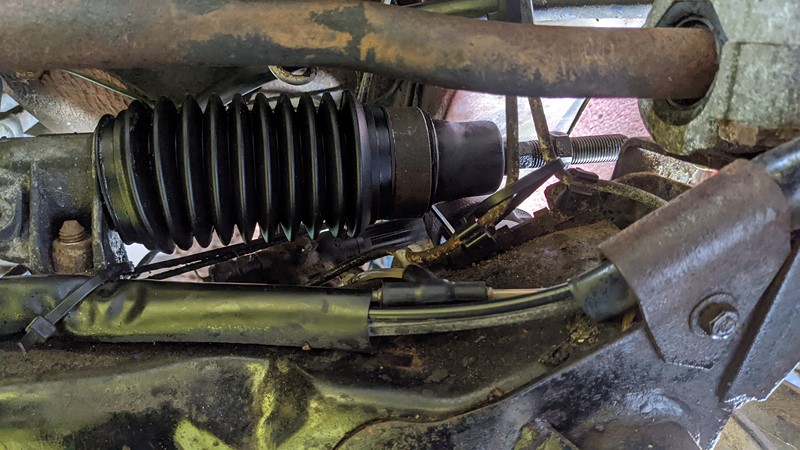
Actually, having said that, I have a lovely close-up of the problem in action;
After years of searching, there doesn’t seem to be a simple solution. On my own car, I installed what should have been a genuine kit (95 496 072) but seemed to be an aftermarket part (I may well have mixed up the box’s mind). I soon suffered the same ‘Popping off issue’ shortly after installation.
I’m aware the Febi kit (18042) is quite ‘fat’ and suffers the bunching issue. On XPO, I’m fitting the Delphi kit (190117daib), although these now seem to have dried up. Let’s see how it goes. For the first time, I’m a little worried about the dwindling availability of some basic consumables for the BX.
While the Delphi boot is okay at full extension, under compression, the bellows get pushed over the fixed portion of the rack. They do, however, stay where they should. After several cycles back and forth, the boot hasn’t made a bid for freedom.
Installing new steering rack boots
The offside, right-hand steering rack boot is shorter and simpler to install. The replacement boot slides on and gets cable tied into place. Hmmm, cable ties. The originals are held with a steel spring clamp, which invariably rots away. I’ve also found that the spring clamps don’t work well on the aftermarket rubber boot. I don’t like using cable ties, but they work.
The offside boot is an absolute nightmare. Honestly, it’s one of those jobs you’ll swear never to do again. The problem is the connection point for the steering ram, which creates a rather significant ‘leg’ for the boot to climb over. Shown in green above, this tall and vital spigot will make you consider swapping to a non-powered rack.
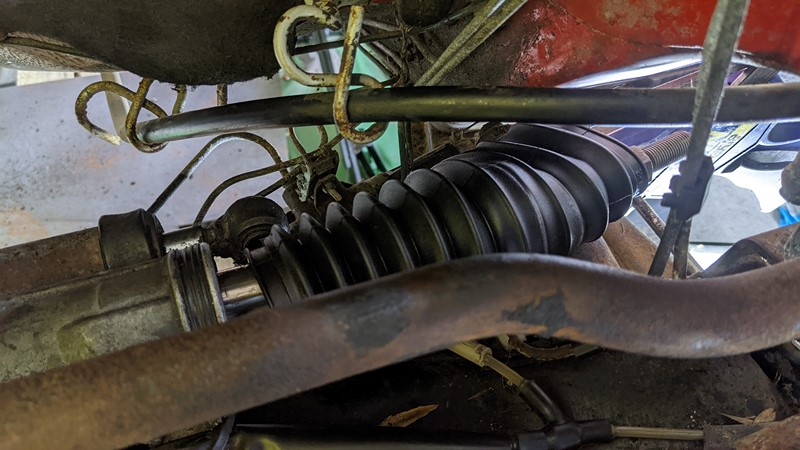
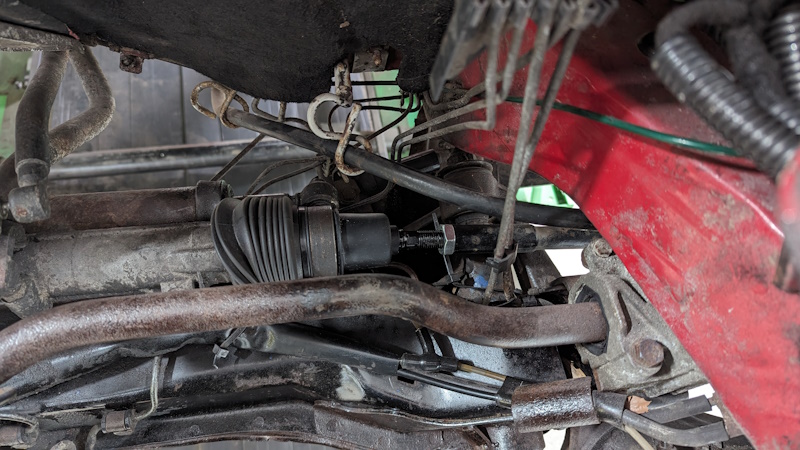
So how do you get the steering rack boot onto the rack, over the leg, without tearing the boot? I can confirm that the task is not easy, but it can be done. The action shot above almost proves that the boot will go on but gives no indication of the battle required.
The answer is a spoon, but I forget the question.
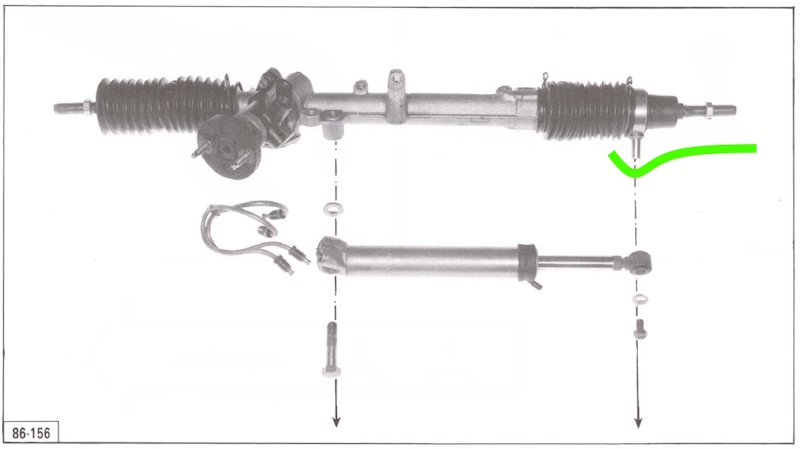
There are a number of ‘solutions’ to sliding the steering rack boot on. The workshop manual suggests taking the whole rack to pieces as an option. However, the same manual tells you to start by taking the rack off the car! My preferred solution, which I was told about long ago, is a desert spoon. The terrible image above shows roughly where to stick the spoon. This guides the boot up and over the leg and saves from overstraining the boot.
There you go. It can be done. However, I’m not convinced that this task should take over 30 minutes. I get the practicality of needing to attach a ram to make the rack assisted, but what a nightmare this job is. I can’t imagine having to do it with the engine in!
Small boot replacement
While the small boot on the near side was relatively straightforward to fit, getting hold of the right part was a nightmare! Over about six months, I ordered several ‘small boots’ by part number 4066 21, and the wrong one was sent each time.
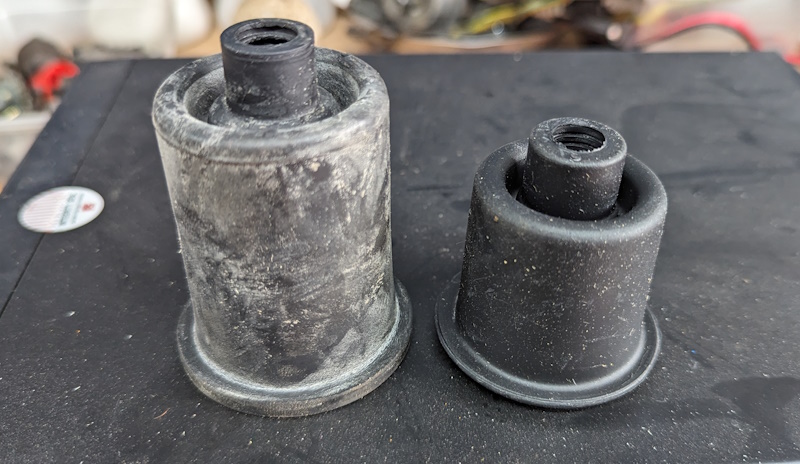
The left-hand one is what kept being sent. I believe a SASIC remanufactured part. I’m not sure what car it is for, but eventually, I managed to track down a genuine Citroen part (on the right). Quite a difference in size. This steering rack boot doesn’t need a zip tie as it has an inbuilt clamp.
The steering rack boot battle, reflection.
Suffice it to say, this was a messy and back-breaking job. From cleaning out the steering rack field of dreams to battling with the nearside boot. Even sourcing the right small boot and getting the last few bits buttoned up has taken over a year to complete the job.
Tackling the steering rack sort of summarises the whole XPO build. It is hugely time-consuming largely because it is so hard to get adequate time to focus on the project. Tracking down consumables to get the job done right is consistently a time-consuming nightmare. Not to mention undoing a lot of poor workmanship.
Will XPO ever get finished? Well, yes, it gets a little closer every week. While these articles are miles behind, the reality is the engine is nearly back in, the interior is mostly in, and the electrics mostly work. Maybe 2024 will be the year!
Maybe not
M
NEXT – Eps31 Cleaning and plating
PREV – Eps29 Windscreen removal
Back to Citroen articles
Back to Automotive articles
Amazon Affiliate Links – Things used in this article
BXProject is using Amazon Affiliate Links. It’s a quick way to show you what I have used in this article.
“As an Amazon Associate, I [may] earn from qualifying purchases.”
Since January 2024, Amazon has blocked embedding images, but I think the links are still valuable.


[…] NEXT – Eps30 Steering Rack BootsPREV – Eps28 A-pillar Painting. Again! […]
Excellent tip with the spoon
Thanks for the continued support and feedback Panky, it’s very much appreciated. Always good to know at least one person is reading!
[…] NEXT – Eps33PREV – Eps30 Steeing Rack Boots […]
Hi, I have the same job to do following MOT failure (offside boot), fortunately mine doesn’t have power steering, so hoping it won’t be too hard. Mileage is around 75000 – is the tie rod likely to be OK at this mileage? Also, is any lubrication needed on the ram (sorry if that is a daft question)?
Hola, yo para meter los guardapolvos de las puntas de transmisión he usado un cono de señalización o un embudo grande, lo lubricas bien lo pones en la punta y empujas lentamente el guardapolvo que vaya abriéndose…. ya luego cuando ha entrado vuelve a su posición, en el caso de la dirección creo que te hubiera venido bastante bien.
Un saludo y gracias por tus tutoriales.
Hi, I like the cone idea. I have seen them used for CV boots before. Maybe one day I’ll invest!
Cheers
M