In a previous article, I looked at the effect of swapping out the BX instrument cluster bulbs with LEDs. The result was very much sub-optimal with bleed, a lack of warmth and because I used green LEDs, the needles where invisible. Members of the BXClub FaceBook group suggested ‘Capless’ bulbs, lets see how we get on!
A Field of Bulbs
To recap on the previous article, there are up to 27 of the T5 fitment bulbs on the BX instrument cluster. Changing them is quite a faff and I do like the idea of never having to change LED variants again.
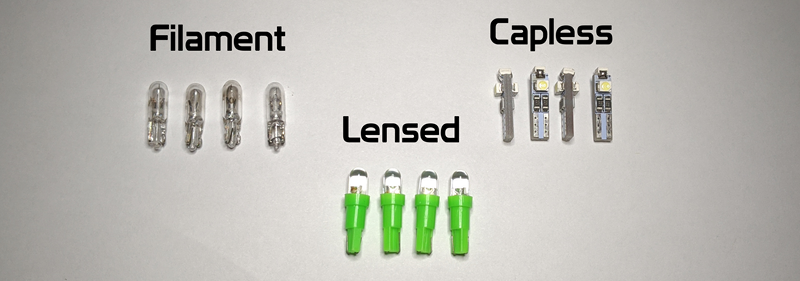
I found that fitting green light-emitting LEDs with a lens on, I’ll call these ‘lensed’ bulbs, gave a pretty poor result. The red coloured needles on the dials were washed out and the brightness was far too intense.
I was advised to use ‘capless’ variants which, as the name suggests, have no cap or lense. Instead, these small PCBs have an LED on each side and one of the ends with a couple of diodes to prevent electrical damage. These give out light in a way that is more in keeping with the traditional filament bulb
Three Way Comparison
Well, they say a picture paints a thousand words, so below is a comparison of the three bulb types. In each picture, the left-hand lights remain as the filament bulbs, with the comparator bulb on the right.
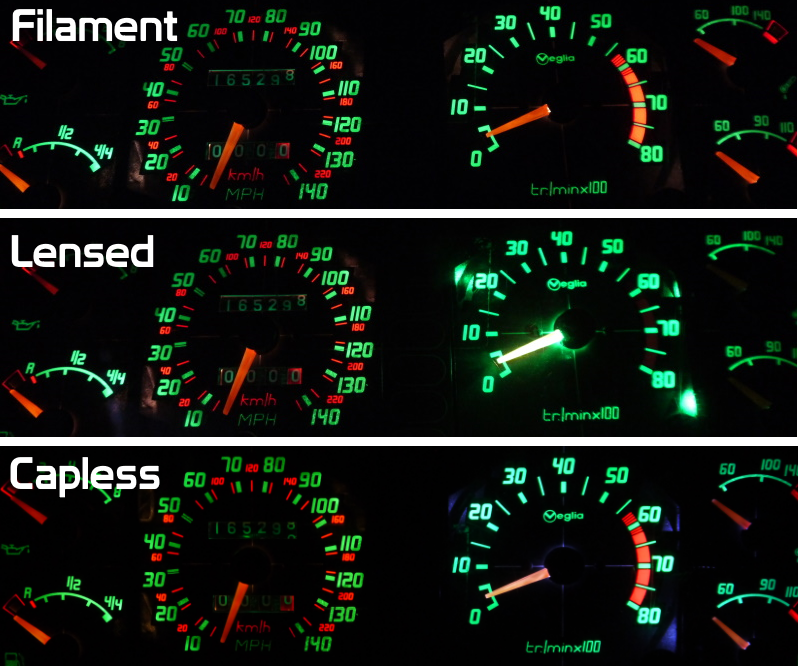
The filament bulbs on the top show how the light would have looked when the car was new. The filtered green illumination is not consistent in brightness across the lighting due to the placement of the bulbs behind. The needles look red, if slightly orange, and there is little bleed through the edge of the mask.
The lensed LEDs are overly bright, washing out the red in the needles and around the 6000 to 8000 rpm range. There is a significant amount of bleed around the edge of the dial masks.
The white capless bulbs are a big improvement over the lensed. The red for the RPM range and needles is now nice and clear, perhaps a bit sharper than the filament bulbs. There is some bleed around the edge of the dial masks. The colour is more ‘neon’ and closer to Vacuum Fluorescent Displays (VFD) that was probably intended.
It’s all to bright for me to take
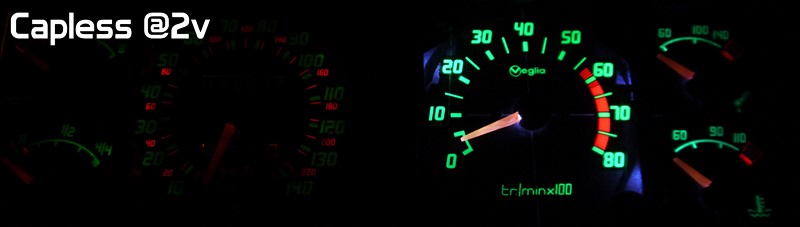
Overall, the capless, while an improvement, are still too bright. Because LEDs emit light at a relatively low forward bias voltage, simply reducing the applied volts does little to the light output. The image above shows the light output at just 2v!
Personally I like to have the cabin lighting pretty dim when driving in the dark, to help preserve night vision. The BX also predates ambient or headlight driven background light intensity. A basic rheostat is the only control with no dimming with headlights or ambient brightness compensation.
Perhaps this is an option for future improvement, but I suspect building a modern lighting controller into a 1970’s designed car, may spoil some of the simplicity. Then again an Arduino all in one microcontroller is a quick and simple way to achieve PWM brightness control of an LED . . .
The Verdict
Using capless instrument cluster LEDs is a step-change in improvement over the lensed variant I tried previously. The colour is closer to what I envisage would look the best and the red filter areas can still be seen.
The brightness is still a problem, but maybe I can build a simple PWM controller to manage the output. Perhaps I should build in some ‘bonus’ features like automatic dimming with headlights.
I think, now I have them, I’ll probably give them a go and see what they are like to live with. Expect another update sometime in the future.
M