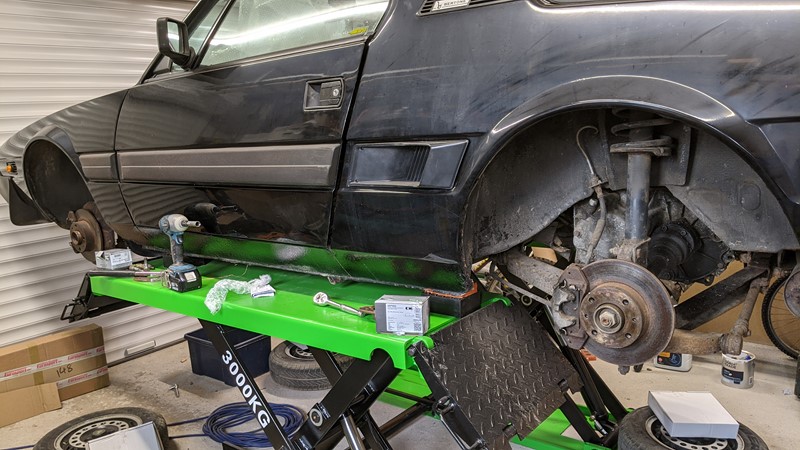
With XPO now running and driving with a nearly OEM exhaust, some new problems have become apparent. Without an engine installed for twelve years, the system has had no real hydraulic pressure. I’m told one of the previous owners used to spin up the pump to keep LHM flowing, but the colour of the old fluid suggests this may not have been very often. Not surprisingly, the green blood drips started when the engine ran for an extended period. The steering rack leak seems to be the worst and needs sorting!
Steering Rack Leak?
While the rear of the vehicle seemed to be hydraulic leak-free, there was a fairly constant stream of green drips at the front of the car. Of the three puddles that slowly formed, one was right at the front of the engine, and the others were on either side of the front subframe. Fortunately, the leak under the FDV was due to a loose connection and was quickly rectified.

The leak on either side of the subframe was a little harder to solve. The GIF above gives an idea of how fast the flow was. While not exactly pouring out of the car, there was a lot more drip than I would ever be happy with. Sure, a leak is a great way to keep the LHM fresh through continuous top up, but makes a mess of the drive.
Leaks over the front of the subframe

When the leak started, the front of the subframe was rather gunked up, and it was hard to find the source of the leak. I don’t like to clean well-oiled subframes, but after some cleaning, I hoped I would have a better chance of finding a single source of LHM escapism. Unfortunately, the leak was so subtle that the green blood slowly filled the front lip of the subframe without giving away the point of the leak.
Leaks over the rear of the subframe

Fortunately, the back of the subframe revealed a little more about the source of the steering rack leak. The fluid was coming from the pinion valve. This bi-directional valve at the bottom of the steering column drives the hydraulic piston, which drives the powered steering. While the seals are relatively easy to change, they are no longer available, and after much searching, I only turned up blanks.

At the other end of the piston, the ram leak back seal was partly weeping. It was not the end of the world, but all signs pointed to removing the rack from the car to fix the steering rack leak. Bugger. This is a task I’ve never done before. Well, I’ve taken racks off but never put them back on. At this point I wished I had saved the parts from the scrap car!
Removing the leaking steering rack
After reading the ‘Book of Lies’, the Citroen Workshop manual, and sitting under the car for a few hours, I deduced that the best way to remove the steering rackwas to remove the engine first! However, I did find a relatively straight forward process which I’ll describe without so much swearing.
Remove ancillaries
I learned this step later, but maximising available room early on makes sense. The first step should really be exhaust removal; however, after so much swearing and putting the bloody thing on in the previous week, there was no way the downpipe was being disconnected!

To give the best access with minimum faffing, the steering rack exhaust shield and gear lever arm were removed. There are no two ways about it; these are fiddly things to remove. There are no shortcuts to be had. Hand tools, patience and a few extra knuckles are called for.

But with a little persistence, the shield can be removed,I promise. Why the steering rack hole isn’t tapped to take a bolt I’ll never know. Getting the 8mm socket on top of a completely invisible nut is rather stress inducing!
Remove pipes
The next step is to remove the hydraulic pipes connecting the rack. The clear nylon leak back pipe is simple enough to remove.

The main hydraulic pipes are a bit more of a fiddle. You cant undo these two connections until the exhaust shield is removed. Ask me how I know! A suitable-sized brake pipe spanner is a huge bonus if you have one.
Remove Track Rods
Despite the swearing that went into the exhaust shield removal, the most stressful part of the removing the leaky steering rack is the track rod removal.

Fortunately, the parts are all reasonably fresh and come away easily, and for once, I managed not to destroy the rubber boots. I’ve invested in a big box of spares to overcome any future mistakes. The track rod ends need winding all the way off.
Remove Rack Retaining Bolts
Finally, the two bolts that hold the rack to the subframe can be removed.

The bolts are hidden in pockets in the subframe and have a spacer on the top side. It is important to remember to a) recover the spacers b) make sure they go back. I try to put them back on the same side.
Finally, extract the rack
With all connections to the rack removed, it should just drop out, right? Wrong!

A tip that wasn’t in the “Book of Lies” or the workshop manual is to take the steering ram off and turn the steering to the right. I couldn’t manage to get the rack out with the ram in place, but once the ram was removed, the rack pretty much fell out! Extending the rack to one side, then pushing towards the left wheel meant the rack could be slid out under the exhaust.
Repairing the steering rack leak
Try as I might, finding the steering pinion seals was seemingly impossible. For a while, getting a fix didn’t look lightly!

However, a chance eBay search turned up a complete steering rack with everything new. New pinion seals, hardy discs, gaiters and so on.
For those who like the details, here are a few close-ups of the refurbished steering rack;


Installing the new steering rack
Installing the new steering rack starts with taking it apart!

Well, taking the plugs out and taking the steering ram off. One step I do like to take with refurbished units is to flush the hydraulic components. I’m not convinced all remanufacturers realise they need to flush Citroen hydraulic components with LHM. Fortunately, the fluid that came out of this ram was bright green.

I wish I had a montage and perhaps some Benny Hill music to go with the drama of reinstalling the steering rack. Fortunately, unlike the Haynes, reversing the removal steps paid off. After maybe an hour, the steering rack leak is no more.

Despite the cost of fitting a completely refurbished rack, the exchange process was relatively straightforward. I’m unsure why I was so concerned other than the many warnings in the Citroen workshop manual.
Hydraulic Leaks Be Gone?
The important question after this time and effort is, predictably, did this stop the hydraulic leak? Well, it certainly helped. In fact, for a few days, I thought the incontinence was cured. But being French, after a few days, a new puddle formed to remind me how wonderful hydropneumatic suspension really is!
I guess I’ll have to come back to avenge the leak in another article!
M
NEXT – Eps46 Hydraulic Octopus
PREV – Eps44 Exhaust Installation