Adding a possibly six-month delay onto the rebuild was finding a downpipe for XPO. When I took the car on from Kitch (apparently, he has an SM now), I knew the car wouldn’t come with a downpipe. This was fine. I have a spare in the loft, so the front section of the exhaust, being unique to the BX 16Valve, wouldn’t make the exhaust installation a challenge. Or so I thought!
The Spare Down Pipe
The spare down pipe was from J603 LLP, a very rotten BX 16Valve I had bought for spares in 2007. J603 LLP brought a lot of parts, which got Jazz back on to XU9J4 power. However, I had two downpipes, both Walker reproductions. The spare had been hoarded away and saved for just this sort of rainy day.

The picture above shows the exhaust back in 2007. The downpipe then lived with my parents for the next eight or so years before moving down south. I remember packing the front pipe into the van when we moved back north. However, despite some serious searching, the pipe has vanished. I will never know whether it has helpfully been taken from the garden as scrap during the mega shed build or simply never packed during the last house move. What I do know is that the pipe is not with me any more!
Finding a front downpipe
After more than a year of looking at all the possible nooks and crannies that a house, garage, and mega shed could provide, I even went through my parents’ garden and garage in total desperation. The original pipe, 96064537, is unique to the Citroen BX 16Valve. Finally, I had to admit defeat and find another solution. After reaching out to many companies over the years to make up a stainless system, I finally found someone up to the challenge of manufacturing a split-down pipe.

Having taken the exhaust of Jazz, I ran the somewhat louder Citroen BX over to JP Exhausts. A few days later, I now had a complete end-to-end stainless system on my car, which freed up enough parts for XPO. I’m deliberately being short on details about the new exhaust, as it’s a good story in its own right. I’ll return to the stainless exhaust manufacture in a separate article, but if you want a sneak peek, check out this video from Adventures in Rust.
Preparing the exhaust for installation
While the exhaust on Jazz was in generally good condition, free from holes or major rust, it could certainly do with some preventative maintenance. Historically, I wasn’t keen on painting exhaust parts, but in my experience, a good coating of very high-temperature (VHT) paint can extend an exhaust’s life by as much as 10 years!

The front downpipe, which came from Jazz, is not an original Citroen part, unlike the missing one. This Walker reproduction downpipe is one of the best aftermarket parts available, with the splitter in the front section extending almost as far through the pipe as the original. The plate, which splits the front section of the pipe into two pieces, reportedly helps with low RPM pickup. I might be precious, but I like to have the Mi16 deliver power as it was intended from the factory.
Cleaning the exhaust pipe
Before painting the front pipe, all of the scale and rust are removed. A wire wheel and a combi-drill make swift work of the build-up and grime but don’t half make a mess. Good job I have XPO out of the garage.

A half hour or so later, and a wipe down with cellulose thinners, and the old exhaust is ready for painting. Although the exhaust is some fifteen years old, it is in surprisingly good condition. Hopefully, it will last for at least another fifteen years under XPO.
Painting the exhaust pipe before installation
I learned a long time ago that good preparation is the difference between VHT paint lasting a year versus five-plus years. The first step was the cleaning, but to get the VHT to really bond to the pipe, I have a little trick.

Gentle application of heat makes the VHT bond so much better. I don’t know how I know about this trick. It might have been from an application guide or perhaps word of mouth, but a little heat definitely helps. In the past, I’ve run the engine to add heat, but this time I am using a heat gun.

There is a huge range of VHT paints on the market. Unfortunately, I can’t say I have a huge range of experience with different brands, but I’ve used Simoniz brand VHT a few times with really good results.
Hanging Around
Once the VHT has been applied, the pipe is hung up while still warm. I’m not sure if the heat keeps the metal surface dry or if the heat reacts with the paint to make a better bond. Either way, it’s nice to be handling warm metal for a change.

A few more coats will be applied over the next few days to get a complete coat. I’m reasonable with a rattle can, but applying multiple layers should make sure I don’t leave any gaps behind.

The ‘hockey stick’ part also gets the same treatment. This exhaust part is still available, so it is less critical to protect the metal. However, I have a little VHT left and might as well use it.
Exhaust installation
With the exhaust system cleaned and prepared, XPO could finally have the last of the engine components installed. Before I even climb under the car, I’m already getting flash backs to how much of a nightmare the Citroen BX exhaust installation can be.

For reasons I’ll come back to in another article, the steering on XPO is suboptimal, and getting the car back into the garage and onto the ramp is simply not a fight I need to take. Instead, I’m working outside on axle stands, on the drive. Fortunately it’s a reasonably warm day for once.

A sheet of cardboard under the car stops me from finding a small pointy stone with my spine, but also saves the fresh paint from being scraped off the exhaust.

The underside of XPO looks remarkably clean, and the new fuel hoses help tidy things up. It is the lack of rust on the underside of XPO which has made the resurrection worthwhile. The car is simply too good to die.
Exhaust Nemesis

Lying on my back, looking up into the engine bay, this will be my view for the next few hours. That eight-branch manifold looks great off the bench, but from this angle, I just bloody hate it. There is very little room to work through to get the nuts onto the studs.

Some serious swearing later and the exhaust system is installed, with plenty of sealant

Finally, the genuine OEM back box at the system’s back end gets a refresh. Last painted in 2009, it gets a quick rub down and sprayed with Kramp paint. Designed for the agricultural market, the Kramp finish is remarkably thick. This is the closest finish I’ve had to the OEM powder coating. And with that, the exhaust installation on XPO is complete. However, with hindsight, I wish I had installed the tail pip with the bumper in place.
Rear Spheres
While the car was in the air, with an exhaust on, and a running engine, I could finally remove the rear spheres. To save from damaging the housing, the rear spheres need to be removed under pressure. This means putting the suspension at full height, with the engine running, then cracking off the sphere. Which is simply loosening a tiny amount with what ever force is required.
Right hand rear sphere

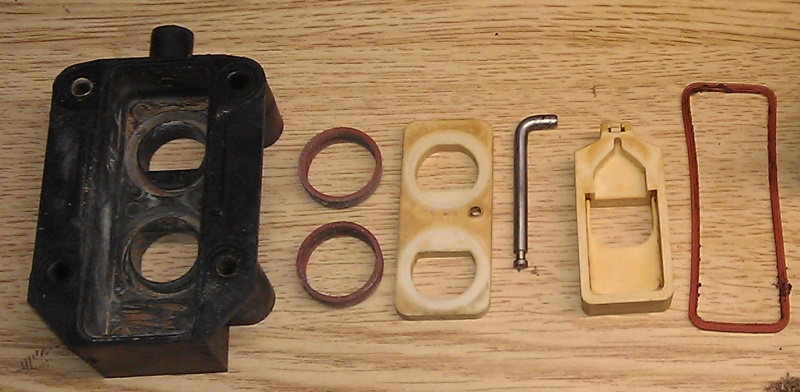
The right-hand side sphere loosened off incredibly easily. Yes, that’s a very old oil filter wrench wrapped around the sphere, and that was all the force required. I was gobsmacked that it came out so freely, and this was probably a good issue. After removing the suspension pressure and removing the sphere, I found the spring for the retaining plate was completely missing!

While a fairly simple piece of metal, the spring holds up the locking plate, which stops the whole rear suspension unit from falling out. Okay, it’s possibly not that dramatic that the spring was missing, as once installed, the sphere does a good job of blocking the escape route of the plate. Fortunately, I had one brand new spring in stock, and despite having been in storage for probably 15 years, I actually knew where it was.

This ‘after’ picture doesn’t justify how many leaves were built behind the sphere. It is no wonder that the aluminium suspension struts corrode out when they are sat in water and dirt inside the housing. Once cleaned, a new seal is installed for the sphere and the IFHS sphere wound in place hand tight.
Left hand rear sphere
Swapping to the other side, the left-hand sphere was a little less willing to part ways with its housing. Stepping up through the many sphere removal tools, and the big bar was the winner.

An obviously homemade tool which I’ve had for a very long time; it has only been defeated once. The simple box section with a piece of rebar is a little clumsy and bulky, but it gets a seriously good grip if space allows. However, despite the size, the tool produces excellent leverage.

The spring for the locking plate was installed correctly on this side, which is fortunate as I don’t have any more spares! A new seal, and the replacement sphere was installed. You’ll notice a relatively dry drip tray under the back of the car. Suspiciously, there was not a lot of fluid in the spheres, despite both registering no pressure on the test rig. Given that one of the diaphragms in the sphere was loose, they really should have been brimming with suspension fluid.
The finished Exhaust Installation
After all the prep, the installation doesn’t take too long at all. Yes, the tailpipe is a little drunk, but this is perfectly normal, unfortunately.

The engine can finally be run up to temperature with the exhaust installed. Proving out the cooling fans, the engine is surprisingly quiet now that the engine output air is baffled. I can get the car back into the garage and work on some of the hydraulic leaks next, which might turn into a bit of a drama!
See you next time!
M