With the engine running, exhaust installed, and hopefully now leak-free, I did have one small issue with moving the car around. While I’d managed to drive the car forward and out of the garage, backwards wasn’t happening. Although I could select the reverse gear and put power to the wheels, the tyres were not happy. At first glance, it would seem I had serious wheel alignment issues.
French Fries or Pizza?
Those who have never had a ski-ing lesson might not know what the ‘French Fries or Pizza’ quote is about. Simply put, if your skis are side by side (like fries in a carton), then you’ll slide. If you push the back of the skis out to make a triangle (or pizza slice shape), then you’ll slow. Both are pointless, as if it’s your first lesson, you’ll brake with your backside (maybe that’s just me). Get the wheel alignment out, and the tyres will act like ‘pizza’ skis and stop the car from moving.

Despite setting up the rack for the track rods to be evenly spaced, and matching the original amount of exposed thread, the front wheels where not pointing straight. Infact, they where particulalry cross eyed! There is no way I would be getting to an MOT with the wheels pointing towards each other.

I managed to get XPO moved back towards the garage with a set of wheel skates and a bit of push and pull. In the process of manually reversing the car across the drive, i noticed the front passenger side wheel seemed to be wandering a lot. Could a failed wheel bearing be the route of the problem?
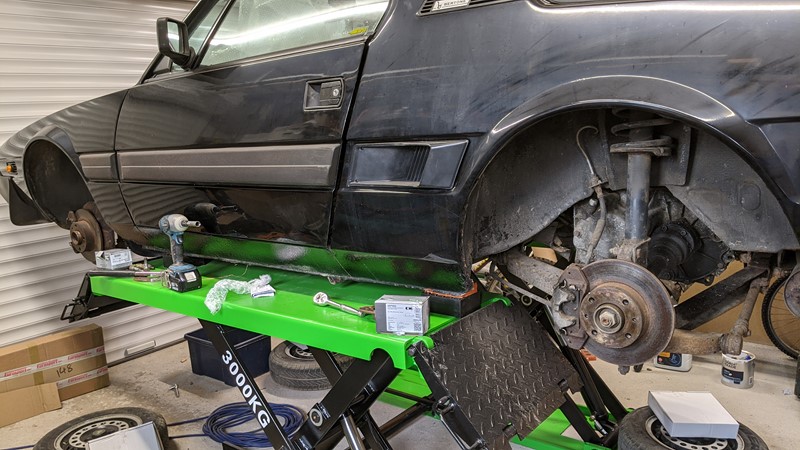
The picture above gives a feel for just how far out the steering alignment was out. The passenger wheel is pointing almost deadly straight, yet the wheel on the drivers side is around 5 degrees toe in. While this might not sound like a lot, but it should be 0.3 degrees toe in (both wheels pointing ever so slighty towards each other to help self-centering of the steering rack. I’m surprised the car even managed to get out of the garage. I suspect rock-hard tyres of ten or more years old probably helped.
Wheel Bearing Change.
The first issue to tackle in the wheel alignment was the play in the front left bearing. Obviously this would be a lot more fun if the car was on a ramp, but forcing the car to the ramp didn’t seem like a great idea. Even if the tyres were, more than past best. Fortunately, this was in March 2024, and the weather was unseasonably mild.

As most of the front of the car had already been apart, getting the hub carrier off the car was surprisingly straightforward. I do like it when cars come apart easily unfortunately, this isn’t common on Citroens of this age. I did think on and pulled the hub out of the carrier before pulling the carrier off the car. Very unlike me to think that far ahead.

While I have some of the genuine Citroen tooling, some times I have to make do! Although the press is 10T, I did need a bit of help from a lump hammer to shock the bearing out. I wonder if this was the original wheel bearing? While the bearing wasn’t grinding, it was very dry. Certainly beyond best.

In less than an hour, the replacement wheel bearing was back in the hub carrier. A short time later, the whole assembly was back on the car. I might have managed the change in 30 minutes if it wasn’t for the pigging circlip.
DIY Wheel Alignment
To get a rough alignment, I’m using a tried and trusted stick-and-string approach. Basically, I clamp bars to the brake discs and then measure the distance between the bars at different places along the bars. Then, apply a bit of trigonometry to figure out the degrees of toe in. Or, in this case, make the measurements the same and leave the final alignment to a grown-up!

Rather than the traditional wooden sticks, I have some aluminum profile lying around. I’m measuring at about 10cm and 50cm from the brake disc. The bars are carefully clamped in the same relative positions on each side. And yes, I did put the brake disc screws in before starting the measurements.

I have to confess, I have never tried to do wheel alignment like this, and it took a little trial and error to get good measurements. This is not meant to be a perfect setup, and the method is riddled with errors. Without the wheels on the ground, and load on the suspension components, alignment is unlikely to be spot on. However, I should be able to get the wheels pointing roughly straight forward, certainly enough to get the car to a show with alignment kit.
[As a side note, I took the car for alignment after the MoT. The wheels were at about -1.2 degrees, quite a long way over the 0.3 degrees. However, for using a couple of sticks and a tape measure, I’ll take it!]
Fucking Clutch Cable
I’m not even going to hide it. I really, really lost my patience with the car when it came to the clutch cable. Back in episode something or other, before the engine had gone in, I proactively replaced the clutch cable with a new one. I ordered the cable based on the Citroen part number, 96081710, and it arrived relatively quickly. But I noticed when installing that it looked, well, odd.

In the image above, the lower cable is the one I took time to install BEFORE the engine went in. Beyond all the plastic-to-rubber interfaces having become disassociated, all the parts were present but didn’t quite look right. I put this down to a newer version or an update in the design, given the BE3 gearbox was used for decades. The upper cable in the picture is the replacement I had to order. A QH bought the part, QCC1426, but a genuine Lecoy cable was in the bag.

While the first and second cables look relatively similar even off the car, there’s a big issue. The first cable is nearly two inches short where it counts. How I got this short cable on the car in the first place, I have no idea. However, I do have an idea how many swear words are needed to recover a clutch cable on an XU9j4-engined Citroen BX. The total number, in my case, was very high.
Installing the cable in situ
The Citroen BX 16V engine is tipped backwards to allow for the large air intake, the clearance at the back of the engine is sub-optimal.

Those who have attempted a clutch cable job themselves will recognise the part above, and the pain it brings. On the right-hand drive BX, the cable comes through the bulkhead at the cambelt end of the engine. Somewhere between the brake valve, cabin heater pipes and hell. There is practically no clearance to the clutch pedal attachment point. My trick to getting the cover plate back in is to slot the rubber and metal plate. This allows the lower screw to be partially inserted, and the plate to be slid in place later.
One of the delays in getting XPO on the road was finding the willpower to tackle this clutch cable change. I knew it would be a nightmare at the start of the project. Perceived pain is why I first replaced the cable with the engine out! After with changing the steering rack, finding the will to change the cable in situ took more than a month. However, once the wheel alignment was complete and the clutch cable adjusted, I could finally drive XPO up and down the drive. A significant victory!
Practically ready for the road now!